SpringBoot-2整合Swagger+Response类
1. 配置
- 在pom.xml中导入swagger的坐标
1
2
3
4
5
6
7
8
9
10
11
12
13
14
15
|
<dependency>
<groupId>io.springfox</groupId>
<artifactId>springfox-swagger2</artifactId>
<version>2.9.2</version>
</dependency>
<dependency>
<groupId>io.springfox</groupId>
<artifactId>springfox-swagger-ui</artifactId>
<version>2.9.2</version>
</dependency>
<dependency>
<groupId>org.projectlombok</groupId>
<artifactId>lombok</artifactId>
</dependency>
|
- 由于一些显示问题或者说扫描问题,在application.yml中编写一段匹配规则
1
2
3
4
5
|
spring:
mvc:
pathmatch:
matching-strategy: ant_path_matcher
|
2. 代码编写
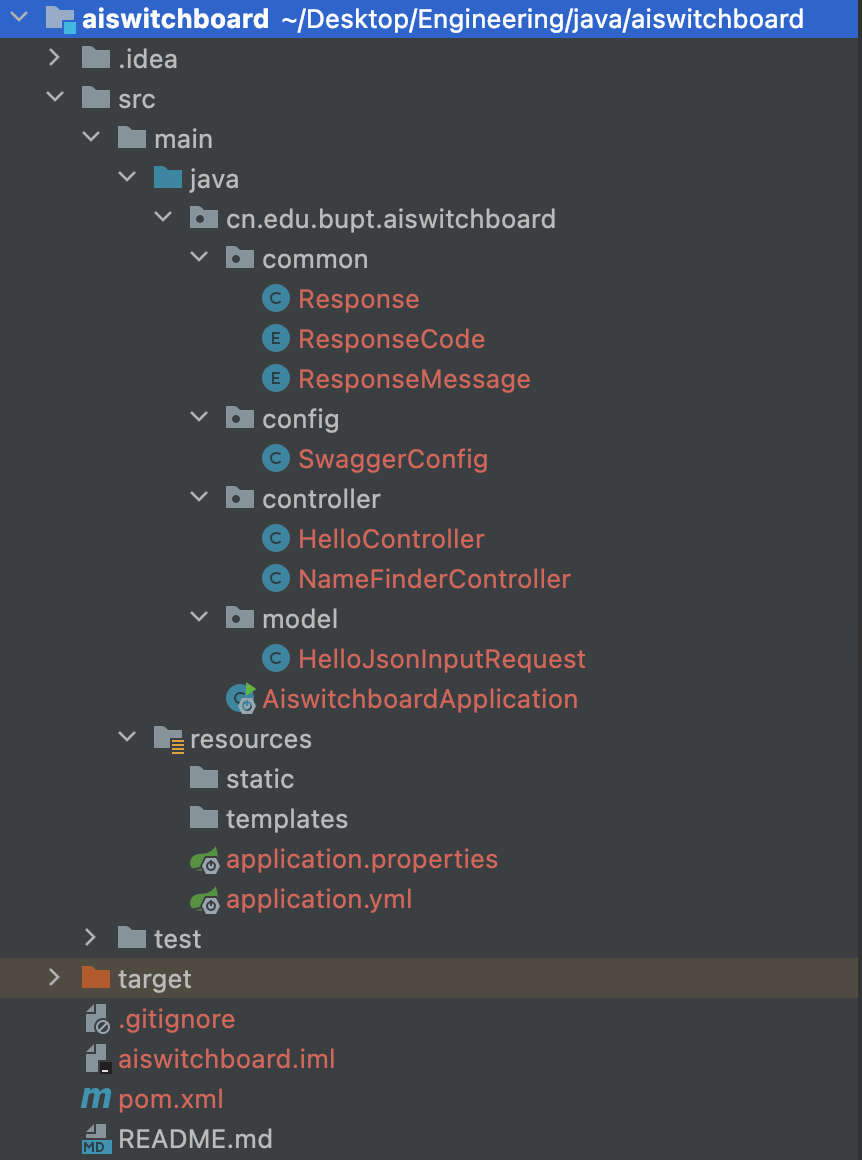
整体项目结构如图所示(红色是因为暂时还没有推到git)

2.1 SwaggerConfig类
这个类里面主要是配置一些接口文档的规则,文档信息什么的,类似于一个模板写法直接把别人的抄过来
1
2
3
4
5
6
7
8
9
10
11
12
13
14
15
16
17
18
19
20
21
22
23
24
25
26
27
28
29
30
31
32
33
34
35
36
37
38
39
40
41
42
43
44
45
46
47
| package cn.edu.bupt.aiswitchboard.config;
import org.springframework.context.annotation.Bean;
import org.springframework.context.annotation.Configuration;
import springfox.documentation.builders.ApiInfoBuilder;
import springfox.documentation.builders.PathSelectors;
import springfox.documentation.builders.RequestHandlerSelectors;
import springfox.documentation.service.ApiInfo;
import springfox.documentation.service.Contact;
import springfox.documentation.spi.DocumentationType;
import springfox.documentation.spring.web.plugins.Docket;
import springfox.documentation.swagger2.annotations.EnableSwagger2;
@Configuration
@EnableSwagger2
public class SwaggerConfig {
@Bean
public Docket getDocket() {
return new Docket(DocumentationType.SWAGGER_2)
.useDefaultResponseMessages(false)
.apiInfo(apiInfo())
.select()
.apis(RequestHandlerSelectors.basePackage("cn.edu.bupt.aiswitchboard.controller"))
.paths(PathSelectors.any())
.build();
}
private ApiInfo apiInfo() {
return new ApiInfoBuilder()
.title("智能总机接口文档")
.description("2023.4.6 将智能总机重构一份java版本,用于自己的java学习并使得项目更加灵活")
.version("1.0")
.contact(new Contact("CuriousLiu;",
"https://yixuan004.github.io/",
"liuyixuan@bupt.edu.cn"))
.build();
}
}
|
2.2 common下的返回值:Response类和ResponseCode ResponseMessage两个Enum
在一个web项目中,把返回值统一成code message data这样一个Response返回类还是很关键的
code:主要就是标识一个状态码,一般是200 500 这样的,或者自己根据类型定义
message:主要就是状态码的解释,比如200对应成功,500对应失败这样的
data:Object类,什么都可以
1
2
3
4
5
6
7
8
9
10
11
12
| ├── src
│ ├── main
│ │ ├── java
│ │ │ └── cn
│ │ │ └── edu
│ │ │ └── bupt
│ │ │ └── aiswitchboard
│ │ │ ├── ...
│ │ │ ├── common
│ │ │ │ ├── Response.java
│ │ │ │ ├── ResponseCode.java
│ │ │ │ └── ResponseMessage.java
|
java中的enum是一种特殊的数据类型,用于表示一组常常量。返回值和响应状态码正好适合这种场景
进一步通过静态变量private final的方式来定义这两个,并且提供getCode和getMessage方法,防止了代码中的错误和不安全行为
private代表只能类内访问,final代表是个一旦初始化就不能修改的
ResponseCode.java
1
2
3
4
5
6
7
8
9
10
11
12
13
14
15
16
17
18
19
| package cn.edu.bupt.aiswitchboard.common;
import java.io.Serializable;
public enum ResponseCode {
SUCCESS(200),
UNKNOWNERROR(500);
private final int code;
ResponseCode(int code) {
this.code = code;
}
public int getCode() {
return code;
}
}
|
ResponseMessage.java
1
2
3
4
5
6
7
8
9
10
11
12
13
14
15
16
| package cn.edu.bupt.aiswitchboard.common;
public enum ResponseMessage {
SUCCESS("SUCCESS"),
UNKNOWNERROR("UNKNOWN ERROR");
private final String message;
ResponseMessage(String message) {
this.message = message;
}
public String getMessage() {
return message;
}
}
|
Response.java
使用泛型类来定义Response,这里的data被泛型类修饰,可以接收各种类型的,在上层初始化Response类的时候,可以用Object这个大类,就使得data可以返回任何类型的,然后提供一个update方法,这个方法可以更新code message和data的数据,用来进行返回值的设计
1
2
3
4
5
6
7
8
9
10
11
12
13
14
15
16
17
18
19
20
21
22
23
24
25
26
27
28
29
| package cn.edu.bupt.aiswitchboard.common;
import io.swagger.annotations.ApiModel;
import io.swagger.annotations.ApiModelProperty;
import io.swagger.annotations.Example;
import io.swagger.annotations.ExampleProperty;
import lombok.Data;
import java.io.Serializable;
@Data
public class Response<T> implements Serializable {
@ApiModelProperty(value = "响应状态码", example = "200, 500")
private int code;
private String message;
private T data;
public Response() {
this.code = ResponseCode.SUCCESS.getCode();
this.message = ResponseMessage.SUCCESS.getMessage();
this.data = null;
}
public void update(int code, String message, T data) {
this.code = code;
this.message = message;
this.data = data;
}
}
|
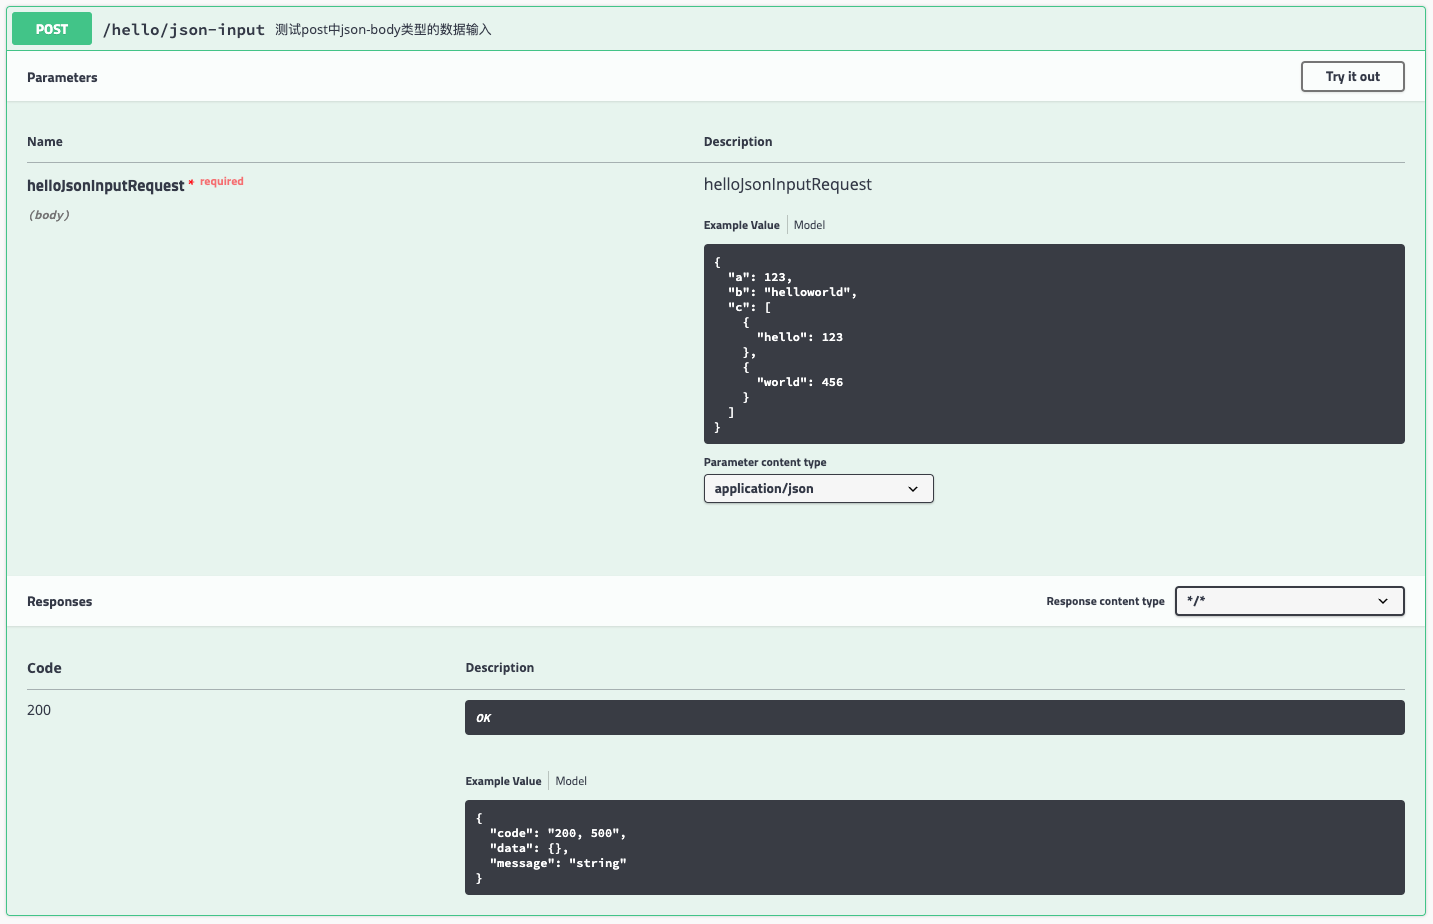
HelloController.java个人理解可以对应到python那边Swagger的一个namespace下,这个下面可以使用RESTful风格进行接口的定义,然后特别注意接口输入这里,对于json可以对应一下
1
2
3
4
5
6
7
8
9
10
11
12
13
14
15
16
17
18
19
20
21
22
23
24
25
26
27
28
29
30
31
32
33
34
35
| package cn.edu.bupt.aiswitchboard.controller;
import cn.edu.bupt.aiswitchboard.common.Response;
import cn.edu.bupt.aiswitchboard.common.ResponseCode;
import cn.edu.bupt.aiswitchboard.common.ResponseMessage;
import cn.edu.bupt.aiswitchboard.model.HelloJsonInputRequest;
import io.swagger.annotations.*;
import org.springframework.web.bind.annotation.*;
import org.springframework.web.multipart.MultipartFile;
@RestController
@Api("hello接口用来进行测试")
@RequestMapping("/hello")
public class HelloController {
@ApiOperation("测试post中json-body类型的数据输入")
@PostMapping("/json-input")
public Response<Object> postJsonInput(@RequestBody HelloJsonInputRequest helloJsonInputRequest) {
Response<Object> resp = new Response<>();
System.out.println(helloJsonInputRequest.toString());
resp.update(ResponseCode.SUCCESS.getCode(), ResponseMessage.SUCCESS.getMessage(), null);
return resp;
}
@ApiOperation("测试post中form-data类型的数据输入")
@PostMapping("/form-input")
public Response<Object> postFormInput(@RequestParam("name") String name,
@RequestParam("age") Integer age,
@RequestPart("file") MultipartFile file) {
Response<Object> resp = new Response<>();
System.out.println("name: " + name);
System.out.println("age: " + age);
System.out.println("file: " + file);
return resp;
}
}
|

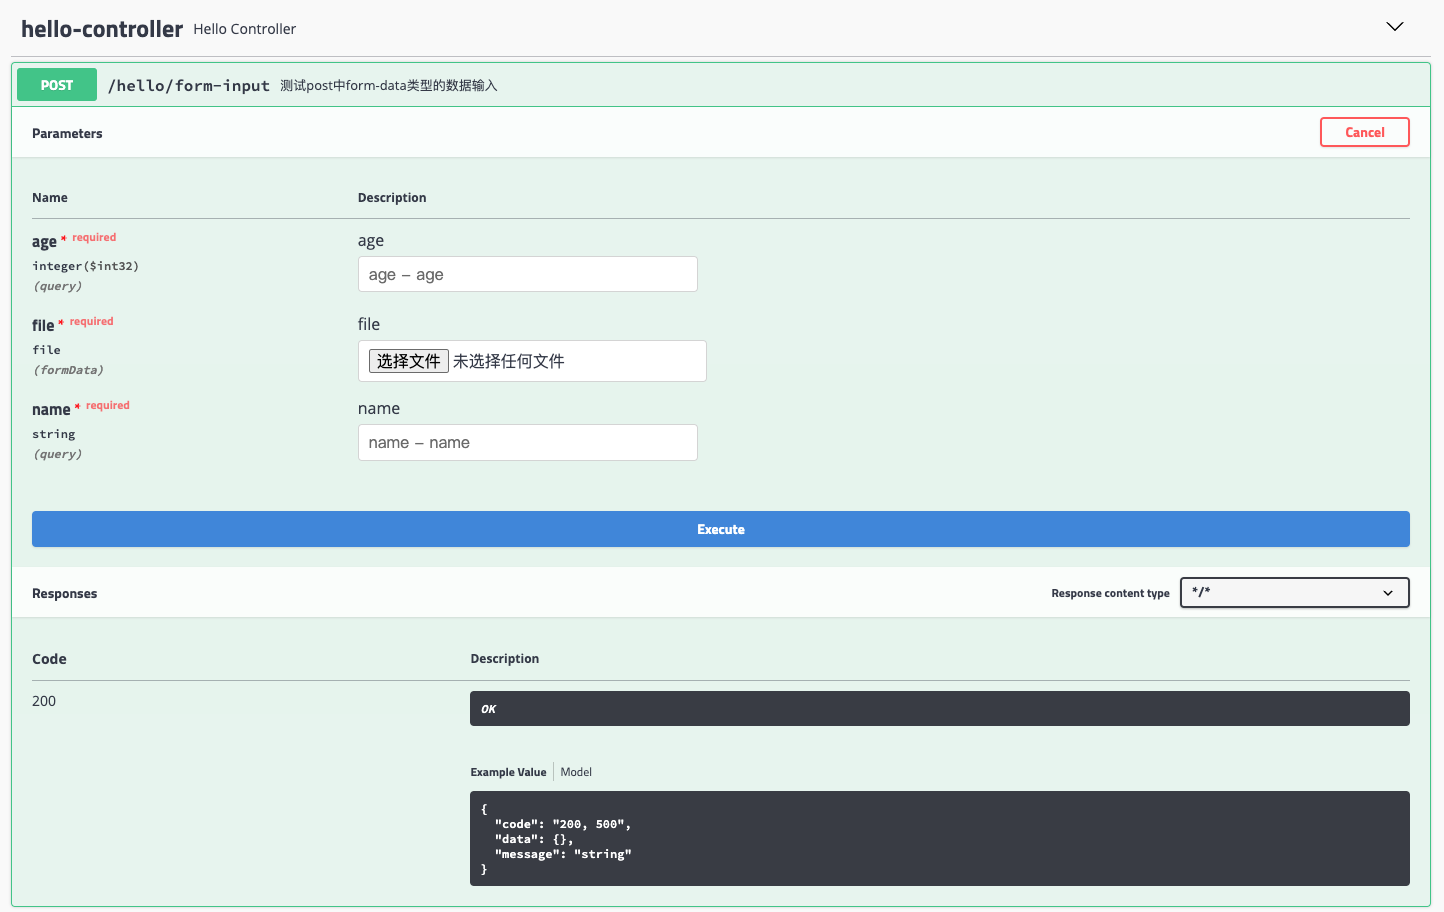
3. 前端效果(返回值的定义还存在一些问题,留待未来解决)


