k8s快速入门-3基于智能114项目的自己实战 1. 项目设计结构
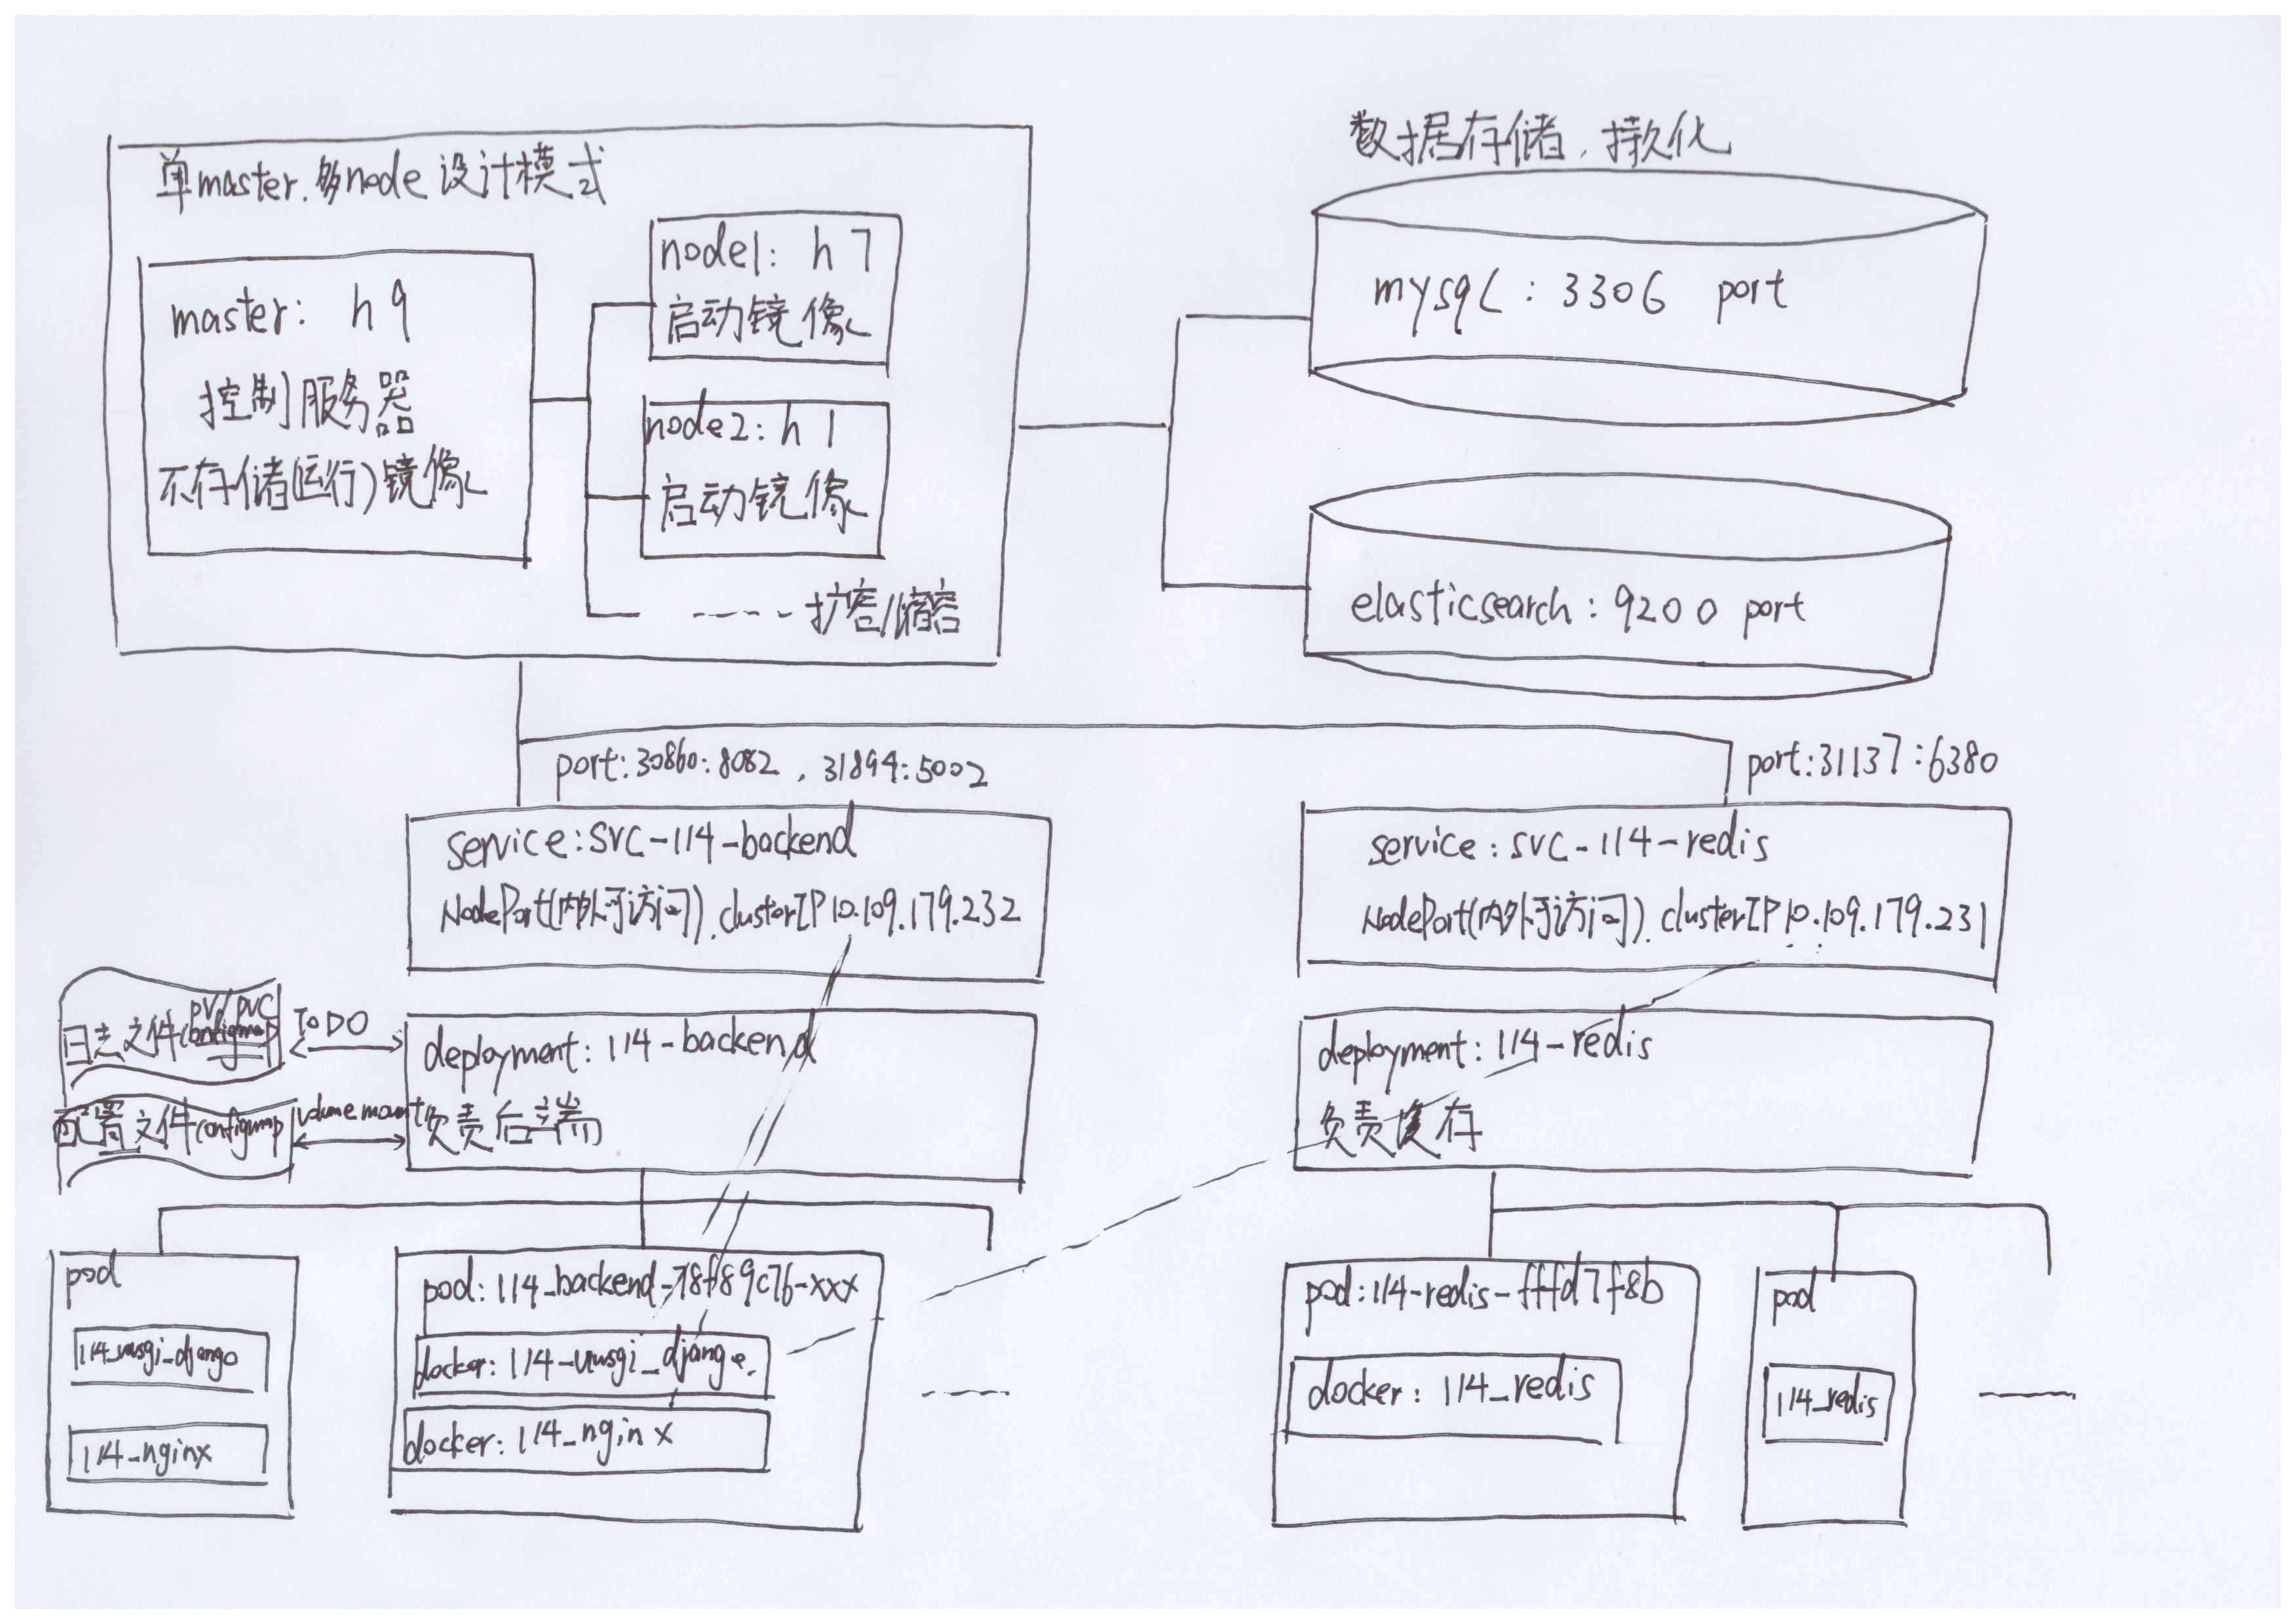
2023.1.26:h9 h7 h1部署后的整体图
2. 阿里云容器镜像服务 https://blog.csdn.net/qq_23034755/article/details/126646493
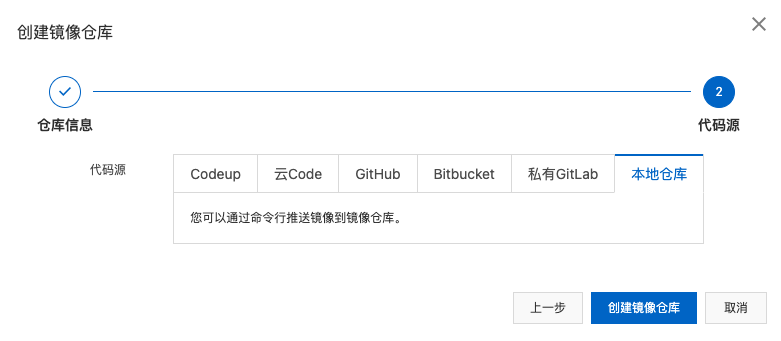
2.1 创建镜像仓库
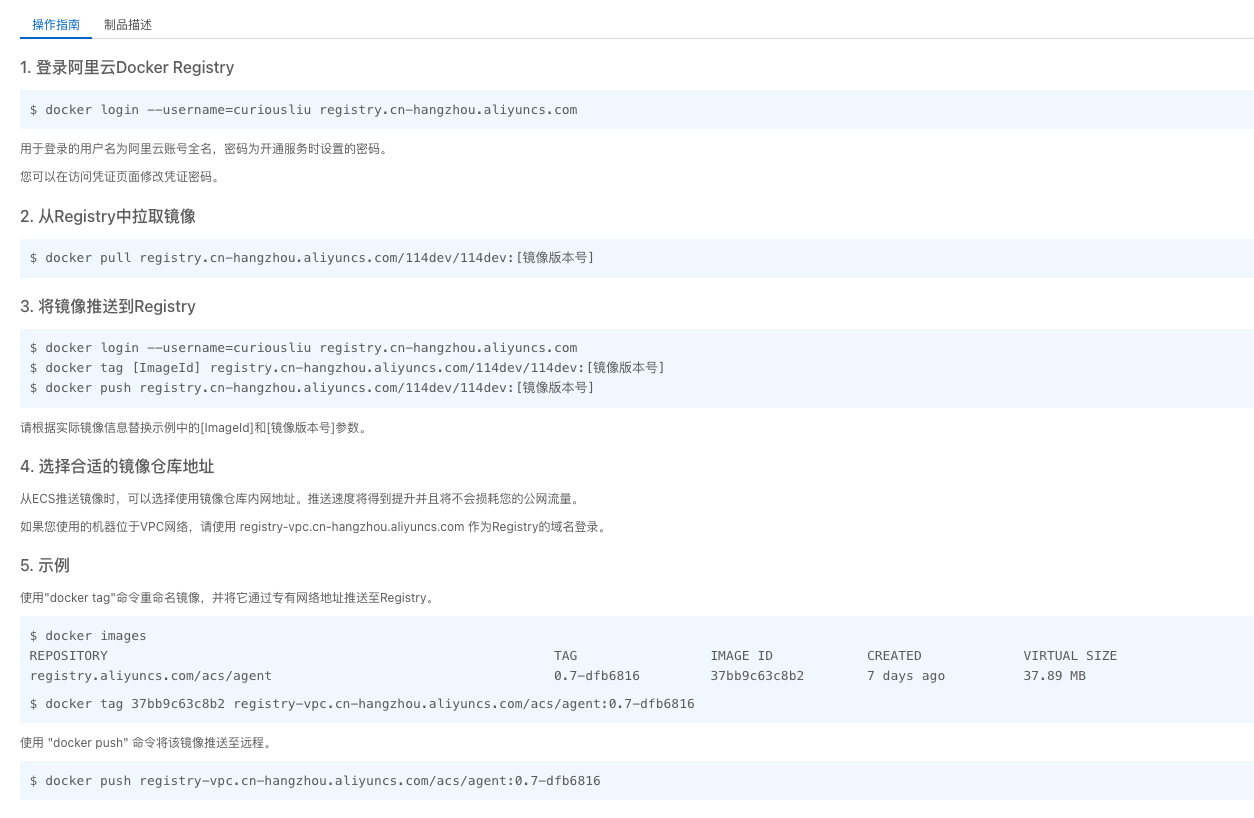
2.1 操作指南(注意,一个服务搞到一个里面去)
2.2 按照操作指南进行操作 2.2.1 redis推送到Registry
1
2
REPOSITORY TAG IMAGE ID CREATED SIZE
1
2
3
$ docker login --username=curiousliu registry.cn-hangzhou.aliyuncs.com $ docker tag 614e3bc05a87 registry.cn-hangzhou.aliyuncs.com/curious/114_redis:v1 $ docker push registry.cn-hangzhou.aliyuncs.com/curious/114_redis:v1
2.2.2 nginx推送到Registry 注意,这里需要预定一下后端的一个clusterIP,很多配置可能要根据这里的clusterIP来进行配置
之前redis的clusterIP定义为10.109.179.231,于是这里后端(nginx、uwsgi+django的clusterIP定义为10.109.179.232)
注意nginx配置文件中相应条目的修改
1
2
3
4
5
6
7
8
9
10
11
12
13
14
15
16
17
18
19
20
21
22
23
24
25
26
27
28
29
30
31
32
33
server {
重新build一遍(请参考以前的内容)
1
2
bupt@h9:~$ sudo docker images | grep nginx
1
2
3
$ docker login --username=curiousliu registry.cn-hangzhou.aliyuncs.com $ docker tag ea5c03878541 registry.cn-hangzhou.aliyuncs.com/curious/114_nginx:v1 $ docker push registry.cn-hangzhou.aliyuncs.com/curious/114_nginx:v1
WARNING! Your password will be stored unencrypted in /root/.docker/config.json.
2.2.3 django+uwsgi推送到Registry 注意,这里需要预定一下后端的一个clusterIP,很多配置可能要根据这里的clusterIP来进行配置
之前redis的clusterIP定义为10.109.179.231,于是这里后端(nginx、uwsgi+django的clusterIP定义为10.109.179.232)
注意好几个地方相应条目的修改
redis(views.py,Entrance.py)
1 socket = 10.109 .179.231 :5002
docker images查看114_uwsgi_django
1
2
bupt@h9:~$ sudo docker images | grep 114_uwsgi_django
1
2
3
$ docker login --username=curiousliu registry.cn-hangzhou.aliyuncs.com $ docker tag 64992d7a2790 registry.cn-hangzhou.aliyuncs.com/curious/114_uwsgi_django:v1 $ docker push registry.cn-hangzhou.aliyuncs.com/curious/114_uwsgi_django:v1
3. 缓存部分(redis) 先不要忘记创建namespace(114dev)
1
2
bupt@h9:~/k8s$ sudo kubectl create ns 114dev
3.1 deployment(注意私有镜像的权限问题)
https://blog.csdn.net/winterfeng123/article/details/113752887
1
2
3
4
5
6
7
kubectl create secret docker-registry 114devsecret \> secret/114devsecret created
deploy-114_redis.yaml(注:yaml文件不能用下划线_)
1
2
3
4
5
6
7
8
9
10
11
12
13
14
15
16
17
18
19
20
21
22
23
apiVersion: apps/v1 kind: Deployment metadata: name: 114 -redis namespace: 114dev spec: replicas: 3 selector: matchLabels: run: 114 -redis template: metadata: labels: run: 114 -redis spec: containers: - image: registry.cn-hangzhou.aliyuncs.com/curious/114_redis:v1 name: 114 -redis ports: - containerPort: 6380 protocol: TCP imagePullSecrets: - name: 114devsecret
1
2
3
4
5
bupt@h9:~/k8s$ sudo kubectl create -f deploy-114_redis.yaml
1
2
bupt@h9:~/k8s$ sudo kubectl delete -f deploy-114_redis.yaml
1
2
3
4
5
6
7
8
9
10
# deploy状态不ok # pod状态显示ImagePullBackOff
3.2 service(附debug过程和解决,主要是私有镜像库的权限问题) svc-114_redis.yaml(注:这里NodePort是向外部暴露端口的方式,然后clusterIP就随便写一个内部的IP)
1
2
3
4
5
6
7
8
9
10
11
12
13
14
apiVersion: v1 kind: Service metadata: name: svc-114-redis namespace: 114dev spec: clusterIP: 10.109 .179 .231 ports: - port: 6380 protocol: TCP targetPort: 6380 selector: run: 114 -redis type: NodePort
1
2
3
4
5
bupt@h9:~/k8s$ sudo kubectl create -f svc-114_redis.yaml
1
2
bupt@h9:~/k8s$ sudo kubectl delete -f svc-114_redis.yaml
3.3 使用curl命令进行redis的测试 好像有些问题,因为这里redis也有些鉴权操作:https://stackoverflow.com/questions/33243121/abuse-curl-to-communicate-with-redis
1
2
3
4
5
bupt@h9:~/k8s$ curl --http0.9 -w "\n" -i -X GET http://10.109.246.xxx:31190
至少不是普通的报错了,说明这里还是有些内容的
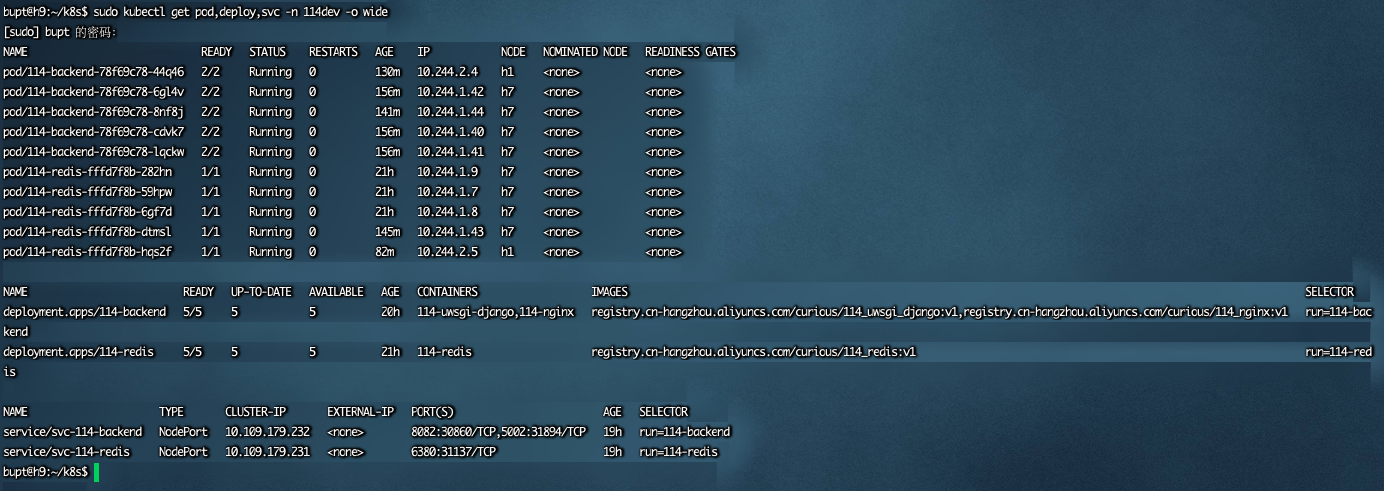
3.4 整体查看
4. 后端部分(nginx、uwsgi+django) 首先对于nginx、uwsgi+django这个部分,需要记住clusterIP的一个自定义的配置,之后会在主图上有体现
4.1 deployment
deploy-114_backend.yaml(注:yaml文件不能用下划线_)
1
2
3
4
5
6
7
8
9
10
11
12
13
14
15
16
17
18
19
20
21
22
23
24
25
26
27
28
apiVersion: apps/v1
1
2
3
4
5
6
7
bupt@h9:~/k8s$ sudo kubectl create -f deploy-114_backend.yaml
1 bupt@h9:~/k8s$ sudo kubectl delete -f deploy-114_backend.yaml
4.2 service svc-114_backend.yaml
1
2
3
4
5
6
7
8
9
10
11
12
13
14
15
16
17
18
19
apiVersion: v1 kind: Service metadata: name: svc-114-backend namespace: 114dev spec: clusterIP: 10.109 .179 .232 ports: - name: nginx port: 8082 targetPort: 8082 protocol: TCP - name: uwsgi port: 5002 targetPort: 5002 protocol: TCP selector: run: 114 -backend type: NodePort
1
2
3
bupt@h9:~/k8s$ sudo kubectl create -f svc-114_backend.yaml
1
2
bupt@h9:~/k8s$ sudo kubectl delete -f svc-114_backend.yaml
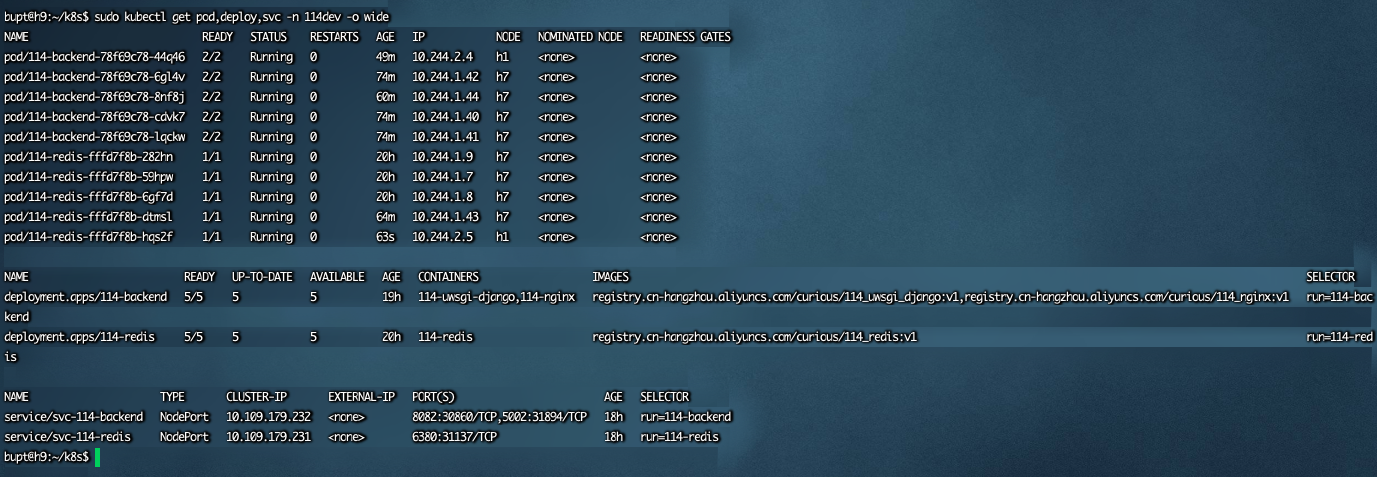
5. 整体查看+curl测试 5.1 整体查看 1 2 3 4 5 6 7 8 9 10 11 12 13 14 15 16 bupt@h9:~/k8s$ sudo kubectl get pod,deploy,svc -n 114dev -o wide
5.2 curl测试 1 2 3 4 5 bupt@h9:~/k8s$ curl --location --request POST 'http://10.109.246.xxx(h9):30860/_114/' --header 'Content-Type: text/plain' --data '{ "commonVersion": "1.0", "taskId": 1, "callId": "20220126_0055", "dialog": "begin", "message": "上海科技大学。", "called": "12345678", "origcall": "87654321" }'
6. 挂载&升级(挂载还有些问题) 原来的114_uwsgi_django需要挂载这些内容:
1 2 3 4 5 6 7 8 9 10 docker run \
现在要想办法把这些在k8s的方式下进行挂载,需要创建configMap,并修改:deploy-114_backend.yaml
尝试使用configMap和直接mount的方式,感觉都有各种各样奇怪的报错,包括下面chatGPT给出的解释:
Q:k8s挂载包含文件夹的文件夹会有问题吗
chatGPT A:在 Kubernetes 中使用 ConfigMap 或者 Secrets 挂载包含文件夹的文件夹时,可能会出现问题。ConfigMap 和 Secrets 都是将文件夹中的文件映射到容器中的文件系统中,如果文件夹中包含文件夹,可能会导致文件夹结构不完整或者文件丢失。为了避免这些问题,建议只在文件夹中挂载单个文件。
6.1 使用configMap挂载所有配置文件(外部->内部) https://www.cnblogs.com/lizexiong/p/14990537.html
/data/sdb2/lyx/mount-files-202211270941/_114config.json(单独文件就用configmap)
1 sudo kubectl create configmap 114config --from-file=/home/bupt/k8s/mount-files-202211270941/_114config.json -n 114dev
/data/sdb2/lyx/mount-files-202211270941/stopwords.txt
1 sudo kubectl create configmap stopword --from-file=/home/bupt/k8s/mount-files-202211270941/stopwords.txt -n 114dev
/data/sdb2/lyx/mount-files-202211270941/CustomDictionary1.txt
1 sudo kubectl create configmap customdictionary1 --from-file=/home/bupt/k8s/mount-files-202211270941/CustomDictionary1.txt -n 114dev
Configs目录下的内容
/home/bupt/k8s/mount-files-202211270941/Configs/COMMON_QUERY_WORD.json
1 sudo kubectl create configmap commonqueryword --from-file=/home/bupt/k8s/mount-files-202211270941/Configs/COMMON_QUERY_WORD.json -n 114dev
/home/bupt/k8s/mount-files-202211270941/Configs/INTENT_CLASSIFICATION_CONFIGS.json
1 sudo kubectl create configmap intentconfig --from-file=/home/bupt/k8s/mount-files-202211270941/Configs/INTENT_CLASSIFICATION_CONFIGS.json -n 114dev
/home/bupt/k8s/mount-files-202211270941/Configs/QUERY_PHONENUMBER_CONFIGS.json
1 sudo kubectl create configmap queryconfig --from-file=/home/bupt/k8s/mount-files-202211270941/Configs/QUERY_PHONENUMBER_CONFIGS.json -n 114dev
/home/bupt/k8s/mount-files-202211270941/Configs/HeteromorphicCharacters.txt
1 sudo kubectl create configmap heteromorphic --from-file=/home/bupt/k8s/mount-files-202211270941/Configs/HeteromorphicCharacters.txt -n 114dev
/home/bupt/k8s/mount-files-202211270941/Configs/IntentClassificationKeywords/doctor.txt
1 sudo kubectl create configmap doctor --from-file=/home/bupt/k8s/mount-files-202211270941/Configs/IntentClassificationKeywords/doctor.txt -n 114dev
/home/bupt/k8s/mount-files-202211270941/Configs/IntentClassificationKeywords/move.txt
1 sudo kubectl create configmap move --from-file=/home/bupt/k8s/mount-files-202211270941/Configs/IntentClassificationKeywords/move.txt -n 114dev
/home/bupt/k8s/mount-files-202211270941/Configs/IntentClassificationKeywords/priority.txt
1 sudo kubectl create configmap priority --from-file=/home/bupt/k8s/mount-files-202211270941/Configs/IntentClassificationKeywords/priority.txt -n 114dev
更新
1 2 3 bupt@h9:~/k8s$ sudo kubectl create configmap queryconfig --from-file /home/bupt/k8s/mount-files-202211270941/Configs/QUERY_PHONENUMBER_CONFIGS.json -o yaml --dry-run -n 114dev | sudo kubectl replace -f -
1 2 3 4 5 6 7 8 bupt@h9:~/k8s$ sudo kubectl get configmap -n 114dev
6.2 使用PV和PVC挂载日志输出(内部->外部) TODO 待尝试
6.3 修改deploy(加入了热更新configMap) 1 2 3 4 5 6 7 8 9 10 11 12 13 14 15 16 17 18 19 20 21 22 23 24 25 26 27 28 29 30 31 32 33 34 35 36 37 38 39 40 41 42 43 44 45 46 47 48 49 50 51 52 53 54 55 56 57 58 59 60 61 62 63 64 65 66 67 68 69 70 71 72 73 74 75 76 77 78 79 80 81 82 83 84 85 86 87 88 89 90 91 92 93 94 95 96 97 98 apiVersion: apps/v1
1 sudo kubectl apply -f deploy-114_backend.yaml
1 sudo kubectl get pod,deploy,svc -n 114dev -o wide
6.4 热更新(注意deploy中的配置) /home/bupt/k8s/reloader.yaml替换掉其中的default为自己的这个namespace(114dev)
1 2 3 4 5 6 7 8 9 10 11 12 13 14 15 16 17 18 19 20 21 22 23 24 25 26 27 28 29 30 31 32 33 34 35 36 37 38 39 40 41 42 43 44 45 46 47 48 49 50 51 52 53 54 55 56 57 58 59 60 61 62 63 64 65 66 67 68 69 70 71 72 73 74 75 76 77 78 79 80 81 82 83 84 85 86 87 88 89 90 91 92 93 94 95 96 97 98 99 100 101 102 103 104 105 106 107 108 109 110 111 112 113 114 115 116 117 118 119 120 121 122 123 124 125 126 127 128 129 130 131 132 133 134 135 136 137 138 139 140 141 142 143 144 145 146 147 148 149 150 151 152 153 154 155 156 157 158 159 160 161 162 163 164 --- apiVersion: v1 kind: ServiceAccount metadata: annotations: meta.helm.sh/release-namespace: "114dev" meta.helm.sh/release-name: "reloader" labels: app: reloader-reloader chart: "reloader-v1.0.2" release: "reloader" heritage: "Helm" app.kubernetes.io/managed-by: "Helm" name: reloader-reloader namespace: 114dev --- apiVersion: rbac.authorization.k8s.io/v1 kind: ClusterRole metadata: annotations: meta.helm.sh/release-namespace: "114dev" meta.helm.sh/release-name: "reloader" labels: app: reloader-reloader chart: "reloader-v1.0.2" release: "reloader" heritage: "Helm" app.kubernetes.io/managed-by: "Helm" name: reloader-reloader-role namespace: 114dev rules: - apiGroups: - "" resources: - secrets - configmaps verbs: - list - get - watch - apiGroups: - "apps" resources: - deployments - daemonsets - statefulsets verbs: - list - get - update - patch - apiGroups: - "extensions" resources: - deployments - daemonsets verbs: - list - get - update - patch - apiGroups: - "" resources: - events verbs: - create - patch --- apiVersion: rbac.authorization.k8s.io/v1 kind: ClusterRoleBinding metadata: annotations: meta.helm.sh/release-namespace: "114dev" meta.helm.sh/release-name: "reloader" labels: app: reloader-reloader chart: "reloader-v1.0.2" release: "reloader" heritage: "Helm" app.kubernetes.io/managed-by: "Helm" name: reloader-reloader-role-binding namespace: 114dev roleRef: apiGroup: rbac.authorization.k8s.io kind: ClusterRole name: reloader-reloader-role subjects: - kind: ServiceAccount name: reloader-reloader namespace: 114dev --- apiVersion: apps/v1 kind: Deployment metadata: annotations: meta.helm.sh/release-namespace: "114dev" meta.helm.sh/release-name: "reloader" labels: app: reloader-reloader chart: "reloader-v1.0.2" release: "reloader" heritage: "Helm" app.kubernetes.io/managed-by: "Helm" group: com.stakater.platform provider: stakater version: v1.0.2 name: reloader-reloader namespace: 114dev spec: replicas: 1 revisionHistoryLimit: 2 selector: matchLabels: app: reloader-reloader release: "reloader" template: metadata: labels: app: reloader-reloader chart: "reloader-v1.0.2" release: "reloader" heritage: "Helm" app.kubernetes.io/managed-by: "Helm" group: com.stakater.platform provider: stakater version: v1.0.2 spec: containers: - image: "stakater/reloader:v1.0.2" imagePullPolicy: IfNotPresent name: reloader-reloader ports: - name: http containerPort: 9091 - name: metrics containerPort: 9090 livenessProbe: httpGet: path: /live port: http timeoutSeconds: 5 failureThreshold: 5 periodSeconds: 10 successThreshold: 1 readinessProbe: httpGet: path: /metrics port: metrics timeoutSeconds: 5 failureThreshold: 5 periodSeconds: 10 successThreshold: 1 securityContext: runAsNonRoot: true runAsUser: 65534 serviceAccountName: reloader-reloader
1 2 3 4 5 6 7 sudo kubectl apply -f /home/bupt/k8s/reloader.yaml# 更新了配置文件后,用这个更新configmap,建议扩容缩容操作不要和这个一起干,会自动生成pods来滚动更新
7. 横向扩展(把h1加进来,变成1master2node) 7.1 操作 按照之前的博客先把h1的k8s环境配置好,然后
1 2 3 4 bupt@h9:~/k8s$ kubeadm token generate
查看:
1 2 3 4 5 bupt@h9:~/k8s$ sudo kubectl get nodes
把deploy中的replicas从3改成4,会发现自动在h1上创建中
1 2 3 4 5 6 7 8 9 10 11 12 13 14 15 16 17 bupt@h9:~/k8s$ sudo kubectl get pod,deploy,svc -n 114dev -o wide
7.2 h1的空间不足问题,对照如下解决 https://blog.csdn.net/weixin_39865737/article/details/126717900
8. 常用命令 8.1 查看所有的状态 1 bupt@h9:~/k8s$ sudo kubectl get pod,deploy,svc -n 114dev -o wide
8.2 DEBUG查看(可以重定向) 1 sudo kubectl describe pod -n 114dev
8.3 批量删除k8s中的异常pod信息(Evicted等) https://blog.csdn.net/Victory_Lei/article/details/126946508
Evicted可使用kubectl中的强制删除命令
1 2 3 4 5 6 7 8 9 # 打印指定命名空间下的所有Evicted 的 pod # # # 批量删掉pod
批量删除所有”Evicted“状态的pod即可
1 2 # 执行完成后,检查是否删除所有Evicted状态的pod
Terminating可使用kubectl中的强制删除命令
1 2 3 4 5 # 删除POD # 删除NAMESPACE
