SpringBoot入门带项目-瑞吉外卖
reference:黑马程序员 https://www.bilibili.com/video/BV13a411q753?p=1&vd_source=2654875159ed89b917fffce42a65196d
项目栈:SpringBoot+SSM
前置知识:java基础知识、java web、 mysql、spring boot、SSM(Spring Spring MVC MyBatis)、Maven(项目构建)
0. 过程中的问题记录
2022.12.19:在看到静态资源映射的时候,我只是一个后端的服务,为什么前端的代码也要写在我这里?还是说一个项目开发的时候,前后端代码就是都融合在一个项目里,只是各自git push各自部分的?
2022.12.19:在基础框架搭起来之后,每个页面感觉都是可以不登录就直接访问的?这样在后期的控制中是怎么控制的,要么感觉很容易就会有泄露等问题?
1. 业务开发
1.1 软件开发整体介绍
1.1.1 软件开发流程
需求分析(产品原型、需求规格说明书)-> 设计(产品文档、UI界面设计、概要设计、详细设计、数据库设计)->编码(项目代码、单元测试)->测试(测试用例、测试报告)->上线运维(软件环境安装、配置)
1.1.2 角色分工
- 项目经理:对整个项目负责,任务分配,把控进度
- 产品经理:进行需求调研,输出需求调研文档,产品原型
- UI设计师:根据产品原型输出界面效果图
- 架构师:项目整体设计、技术选型等
- 开发工程师:代码实现
- 测试工程师:编写测试用例,输出测试报告
- 运维工程师:软件环境搭建,项目上线
1.1.3 软件环境
- 开发环境(development):开发人员在开发阶段使用的环境,一般外部用户无法访问
- 测试环境(testing):专门给测试人员使用的环境,用于测试项目,一般外部用户无法访问
- 生产环境(production):即上线环境,正式提供对外服务的环境
1.2 瑞吉外卖项目整体介绍
1.2.1 项目介绍
为餐饮企业定制的点菜产品,管理后台和移动端两部分,后台主要是维护,前台就是用来点菜
分为3期进行开发:
- 实现基本需求,移动端应用通过h5实现,用户通过手机浏览器访问
- 针对移动端应用改进,微信小程序实现,用户使用更方便
- 优化升级,提升访问性能
1.2.2 产品原型展示
成型之前的简单框架,通过原型展示更加了解项目的需求和提供的功能
主要是用于提供原型展示项目的功能,而不是最终实现出来的效果
1.2.3 技术选型

1.2.4 功能架构

1.2.5 角色
- 后台系统管理员:登录后台管理系统,拥有后台系统中的所有操作权限
- 后台系统普通员工:登录后台管理系统,对菜品、套餐、订单进行管理
- C(Customer)端用户:登录应用,浏览菜品,添加购物车等
1.3 开发环境搭建
这个项目暂时就先在本地开发了,根据了解来说,好像流程就是本地开发,然后服务器放打包的包
但是数据库mysql redis那些的可以用服务器远程的,有些时候可能需要端口转发或者怎么的方法,也可能可以用那个ip直接连,但是比如mysql就需要进行配置
1.3.1 数据库环境搭建
- 使用navicat新建数据库(或者使用命令的方式也可以,暂时先使用h9的数据库)

1
| create databases reggie character set utf8mb4;
|
可以用source的方式导入,也可以直接图形化界面导入
这里表结构是项目提供的,用这个方式进行领取:https://www.bilibili.com/read/cv11763184
导入后,navicat可视化如下所示

1
2
3
4
5
6
7
8
9
10
11
12
13
14
15
16
17
| mysql> show tables;
+------------------+
| Tables_in_reggie |
+------------------+
| address_book | # 地址簿表
| category | # 菜品和套餐分类表
| dish | # 菜品表
| dish_flavor | # 菜品口味关系表
| employee | # 员工表
| order_detail | # 订单明细表
| orders | # 订单表
| setmeal | # 套餐表
| setmeal_dish | # 套餐菜品关系表
| shopping_cart | # 购物车表
| user | # 用户表(Customer端)
+------------------+
11 rows in set (0.00 sec)
|
1.3.2 maven项目搭建
- 创建maven项目(使用IDEA)

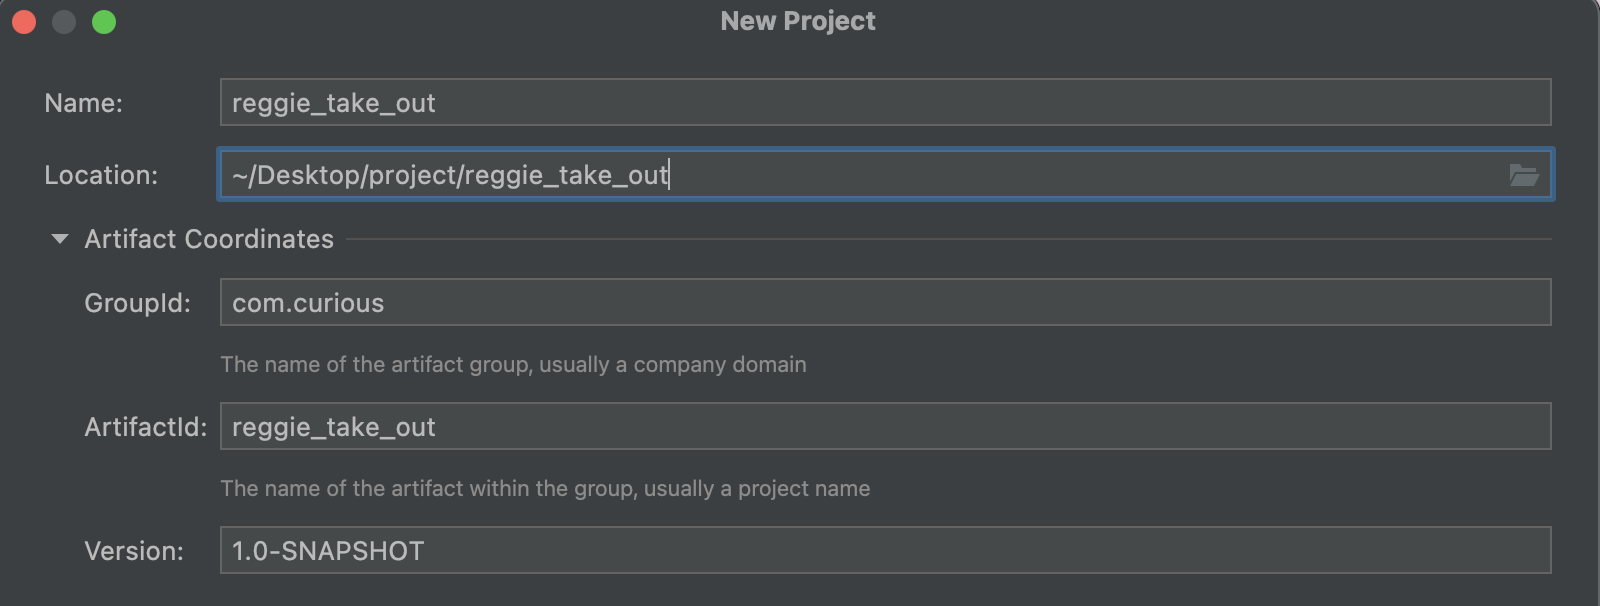
注意,创建完成后要看看maven和jdk那些选的对不对,如下所示

maven:

runner:

sdk(file->project structure):
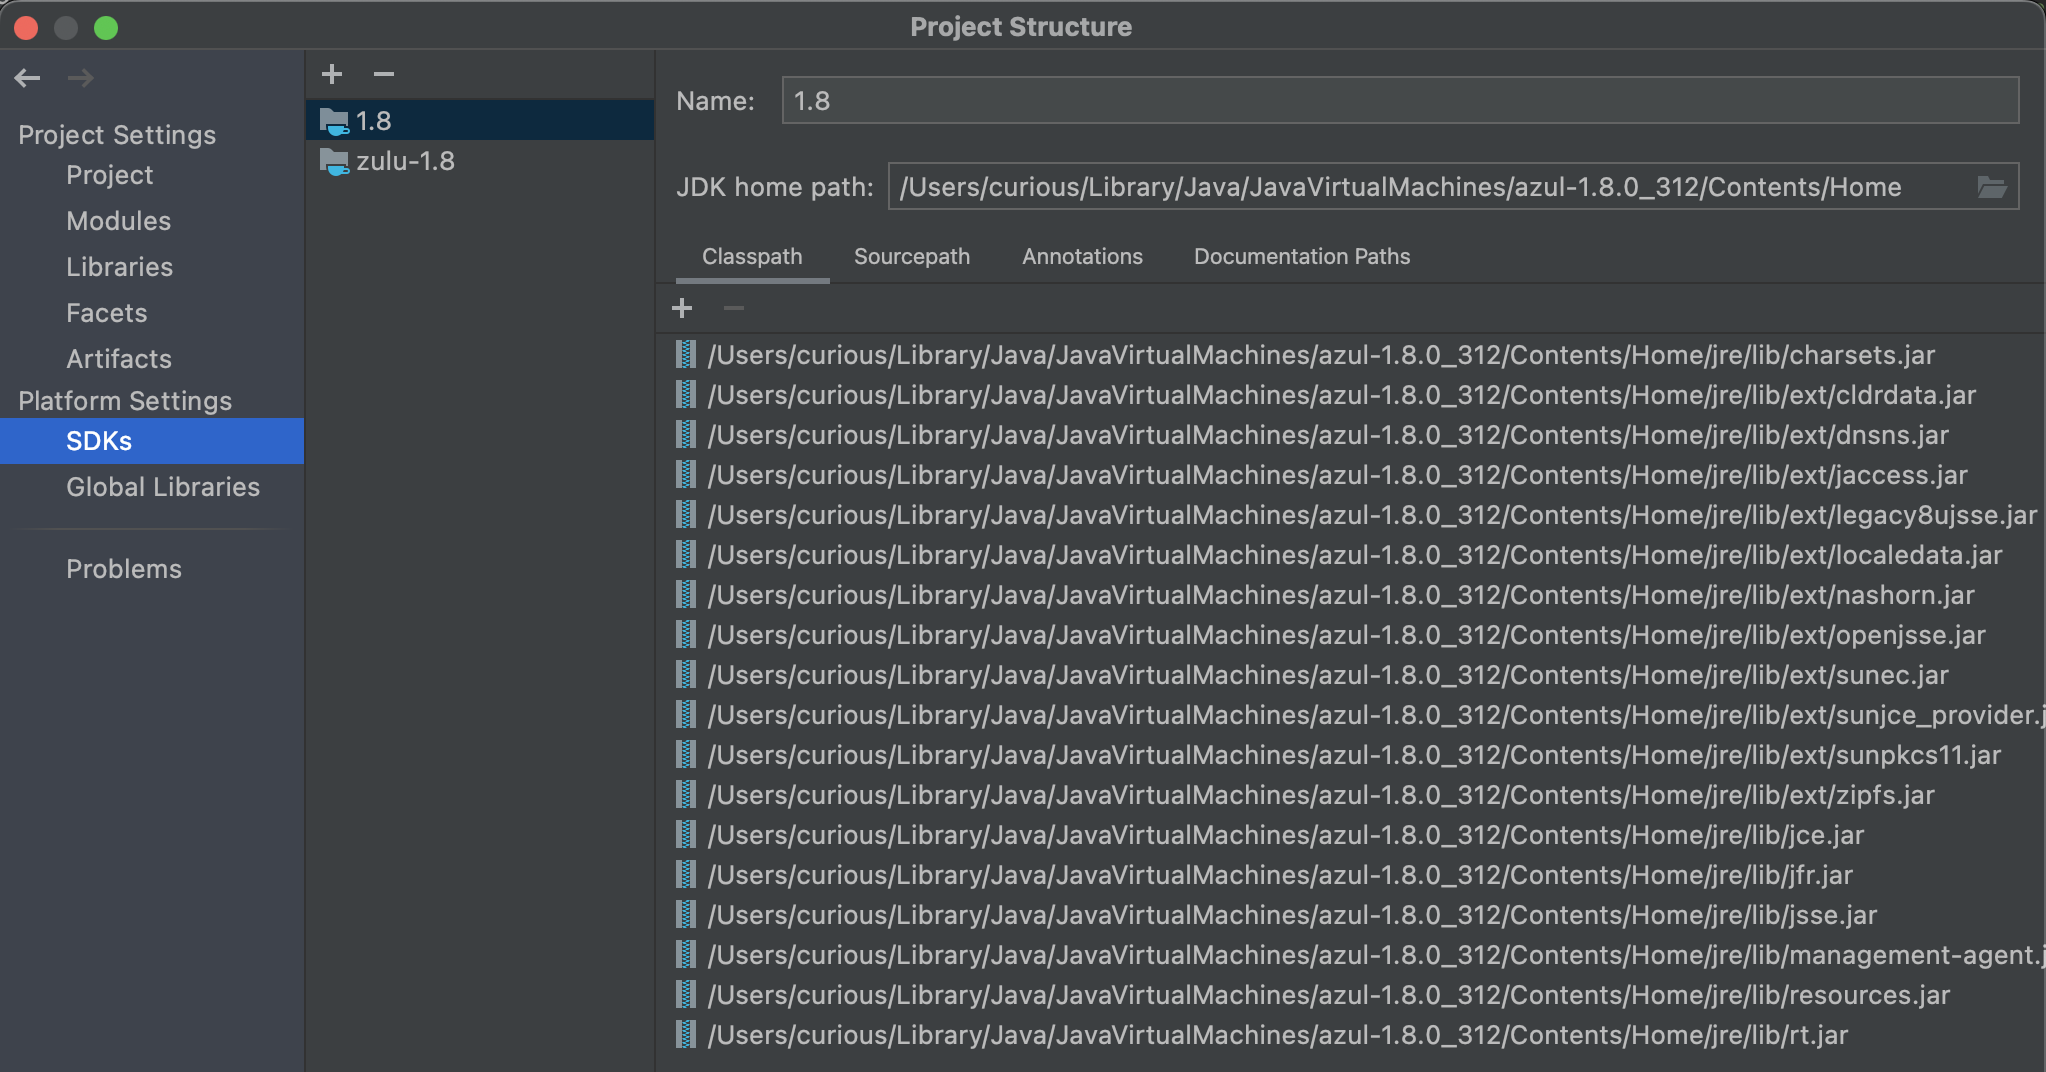
- 导入pom文件,直接导入的方式,在教程给的资料里面有个pom.xml文件
继承了spring-boot-starter-parent2.4.5,先把这段给复制到那边的maven里面去
1
2
3
4
5
6
| <parent>
<groupId>org.springframework.boot</groupId>
<artifactId>spring-boot-starter-parent</artifactId>
<version>2.4.5</version>
<relativePath/>
</parent>
|
然后properties,这块有个1.8也给复制到那边的properties里面去
1
2
3
| <properties>
<java.version>1.8</java.version>
</properties>
|
dependency,也粘贴到下面去
1
2
3
4
5
6
7
8
9
10
11
12
13
14
15
16
17
18
19
20
21
22
23
24
25
26
27
28
29
30
31
32
33
34
35
36
37
38
39
40
41
42
43
44
45
46
47
48
49
50
51
52
53
54
55
56
57
58
59
60
61
62
63
64
65
66
| <dependencies>
<dependency>
<groupId>org.springframework.boot</groupId>
<artifactId>spring-boot-starter</artifactId>
</dependency>
<dependency>
<groupId>org.springframework.boot</groupId>
<artifactId>spring-boot-starter-test</artifactId>
<scope>test</scope>
</dependency>
<dependency>
<groupId>org.springframework.boot</groupId>
<artifactId>spring-boot-starter-web</artifactId>
<scope>compile</scope>
</dependency>
<dependency>
<groupId>com.baomidou</groupId>
<artifactId>mybatis-plus-boot-starter</artifactId>
<version>3.4.2</version>
</dependency>
<dependency>
<groupId>org.projectlombok</groupId>
<artifactId>lombok</artifactId>
<version>1.18.20</version>
</dependency>
<dependency>
<groupId>com.alibaba</groupId>
<artifactId>fastjson</artifactId>
<version>1.2.76</version>
</dependency>
<dependency>
<groupId>commons-lang</groupId>
<artifactId>commons-lang</artifactId>
<version>2.6</version>
</dependency>
<dependency>
<groupId>mysql</groupId>
<artifactId>mysql-connector-java</artifactId>
<scope>runtime</scope>
</dependency>
<dependency>
<groupId>com.alibaba</groupId>
<artifactId>druid-spring-boot-starter</artifactId>
<version>1.1.23</version>
</dependency>
</dependencies>
<build>
<plugins>
<plugin>
<groupId>org.springframework.boot</groupId>
<artifactId>spring-boot-maven-plugin</artifactId>
<version>2.4.5</version>
</plugin>
</plugins>
</build>
|
这里整体过一下,这些感觉就是一些jar包,类似python那种import东西的感觉?python要pip install,但是这个在这块就直接ide下载了
starter mybatis等等
- application.yml
这个搞到那个resources目录src/main/resources/applications.yml
这里的mysql要改一下密码,然后设置到远程的服务器那边
1
2
3
4
5
6
7
8
9
10
11
12
13
14
15
16
17
18
19
20
21
| server:
port: 8080
spring:
application:
name: reggie_take_out
datasource:
druid:
driver-class-name: com.mysql.cj.jdbc.Driver
url: jdbc:mysql://ipipipipip:3306/reggie?serverTimezone=Asia/Shanghai&useUnicode=true&characterEncoding=utf-8&zeroDateTimeBehavior=convertToNull&useSSL=false&allowPublicKeyRetrieval=true
username: root
password: xxxxxx
mybatis-plus:
configuration:
map-underscore-to-camel-case: true
log-impl: org.apache.ibatis.logging.stdout.StdOutImpl
global-config:
db-config:
id-type: ASSIGN_ID
|
1.3.3 编写一个启动类并启动测试(SpringBoot)
创建包结构src/main/java/com/curious/reggie
启动类的类名创建为ReggieApplication
src/main/java/com/curious/reggie/ReggieApplication.java
1
2
3
4
5
6
7
8
9
10
11
12
13
14
| package com.curious.reggie;
import lombok.extern.slf4j.Slf4j;
import org.springframework.boot.SpringApplication;
import org.springframework.boot.autoconfigure.SpringBootApplication;
@Slf4j
@SpringBootApplication
public class ReggieApplication {
public static void main(String[] args) {
SpringApplication.run(ReggieApplication.class, args);
log.info("项目启动成功...");
}
}
|
点击绿色箭头来run main方法, 这里输出项目启动成功

这个时候访问localhost进行curl请求,已经会有返回值了,而不是一个端口不开放那种的
1
2
| (base) ➜ /Users/curious ✻ curl --location --request GET 'localhost:8080'
{"timestamp":"2022-12-19T10:06:18.520+00:00","status":404,"error":"Not Found","message":"","path":"/"}%
|
1.3.4 导入前端界面(这里不要求前端知识)
项目已经提供好了前端的页面,backend是后台管理系统设计的页面,front是移动端的一些页面
把backend和front这两个粘贴到resources目录下,即src/main/resources
这块有个小问题,前面讲SpringBoot的时候,应该也提到过了,对于我们引入的静态资源,建议放在static或template目录下面,这样放在backend和front默认是访问不到的
我们需要进行一个静态资源映射,为了能访问到这两个静态资源,需要编写一个配置类src/main/java/com/curious/reggie/config/WebMvcConfig.java,MVC框架静态资源的映射,如下:
1
2
3
4
5
6
7
8
9
10
11
12
13
14
15
16
17
18
19
20
21
| package com.curious.reggie.config;
import lombok.extern.slf4j.Slf4j;
import org.springframework.context.annotation.Configuration;
import org.springframework.web.servlet.config.annotation.ResourceHandlerRegistry;
import org.springframework.web.servlet.config.annotation.WebMvcConfigurationSupport;
@Slf4j
@Configuration
public class WebMvcConfig extends WebMvcConfigurationSupport {
@Override
protected void addResourceHandlers(ResourceHandlerRegistry registry) {
log.info("开始进行静态资源映射...");
registry.addResourceHandler("/backend/**").addResourceLocations("classpath:/backend/");
registry.addResourceHandler("/front/**").addResourceLocations("classpath:/front/");
}
}
|
这样再次通过main函数进行启动的时候,会可以看到下面这个界面:
这里本来还是打不开,弹幕指导下需要清除一下缓存,idea清一下缓存: https://blog.csdn.net/nandao158/article/details/123803318

这里为什么报错?因为发送了ajax请求,请求了后端,但是后端还没开发,所有报错了,暂时先不用管他
1.4 后台登录功能开发
前面的步骤把环境已经搭建好了,现在在搭建环境的基础上,开发进一步的功能,这里登录功能比较简单
1.4.1 需求分析
一般是从页面原型开始说起src/main/resources/backend/page/login


关心点击登录按钮后,请求到哪里去了


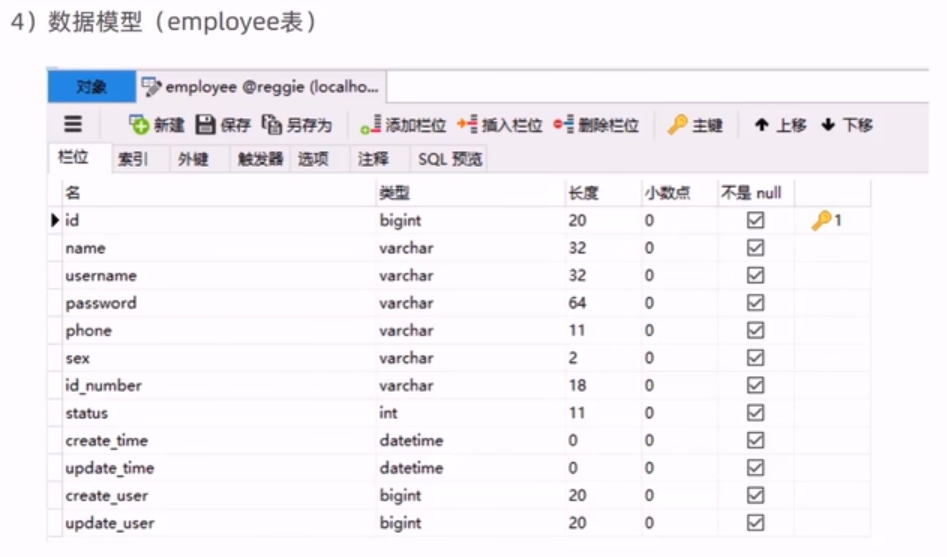
这里还可以去关心一下前端那块的逻辑,约定了1表示登陆成功等等,这里约定好了服务端需要给返回什么字段的数据,code data msg
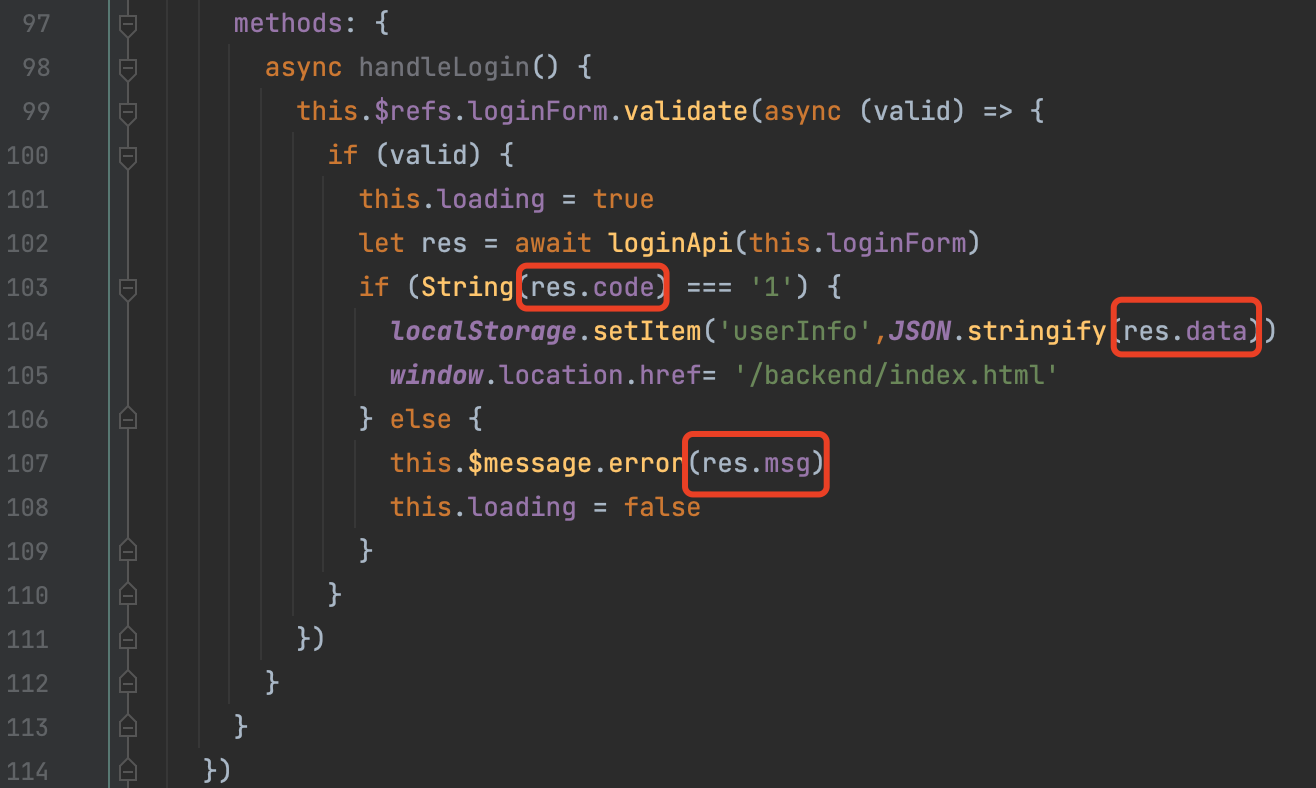
1.4.2 代码开发——基础各个地方的定义
- 创建实体类Employee,和employee表进行映射,数据库中有一个表,就习惯去创建一个实体类和他映射,实体类的属性和表里的字段一一来映射,创建的实体类放到这里
src/main/java/com/curious/reggie/entity/Employee.java
1
2
3
4
5
6
7
8
9
10
11
12
13
14
15
16
17
18
19
20
21
22
23
24
25
26
27
28
29
30
31
32
33
34
35
36
37
38
39
40
41
42
43
| package com.curious.reggie.entity;
import com.baomidou.mybatisplus.annotation.FieldFill;
import com.baomidou.mybatisplus.annotation.TableField;
import java.io.Serializable;
import java.time.LocalDateTime;
public class Employee implements Serializable {
private static final long serialVersionID = 1L;
private Long id;
private String username;
private String password;
private String phone;
private String sex;
private String idNumber;
private Integer status;
private LocalDateTime createTime;
private LocalDateTime updateTime;
@TableField(fill = FieldFill.INSERT)
private Long createUser;
@TableField(fill=FieldFill.INSERT_UPDATE)
private Long updateUser;
}
|
- 下面来把调用链条上的,Controller Service Mapper都给创建出来


这个地方和mybatis关系很大,之后需要详细看看mybatis这块是怎么搞的
mapper:src/main/java/com/curious/reggie/mapper/EmployeeMapper.java,这是个接口(Interface)
1
2
3
4
5
6
7
8
9
10
| package com.curious.reggie.mapper;
import com.baomidou.mybatisplus.core.mapper.BaseMapper;
import com.curious.reggie.entity.Employee;
import org.apache.ibatis.annotations.Mapper;
@Mapper
public interface EmployeeMapper extends BaseMapper<Employee> {
}
|
service:src/main/java/com/curious/reggie/service/EmployeeService.java,接口定义好了
1
2
3
4
5
6
7
| package com.curious.reggie.service;
import com.baomidou.mybatisplus.extension.service.IService;
import com.curious.reggie.entity.Employee;
public interface EmployeeService extends IService<Employee> {
}
|
创建接口的实现类(Impl那块)src/main/java/com/curious/reggie/service/impl/EmployeeServiceImpl.java
1
2
3
4
5
6
7
8
9
10
11
| package com.curious.reggie.service.impl;
import com.baomidou.mybatisplus.extension.service.impl.ServiceImpl;
import com.curious.reggie.entity.Employee;
import com.curious.reggie.mapper.EmployeeMapper;
import com.curious.reggie.service.EmployeeService;
import org.springframework.stereotype.Service;
@Service
public class EmployeeServiceImpl extends ServiceImpl<EmployeeMapper, Employee> implements EmployeeService {
}
|
controller:src/main/java/com/curious/reggie/controller/EmployeeController.java
1
2
3
4
5
6
7
8
9
10
11
12
13
14
15
16
17
| package com.curious.reggie.controller;
import com.curious.reggie.service.EmployeeService;
import lombok.extern.slf4j.Slf4j;
import org.springframework.beans.factory.annotation.Autowired;
import org.springframework.web.bind.annotation.RequestMapping;
import org.springframework.web.bind.annotation.RestController;
@Slf4j
@RestController
@RequestMapping("/employee")
public class EmployeeController {
@Autowired
private EmployeeService employeeService;
}
|
上面都创建好了之后,需要去写我们的login方法,在写登录方法之前导入返回结果类R
R:这个类是一个通用类,服务端相应的所有请求结果,最终都会包装乘这种类型返回给前端页面,这个项目把所有的都封装成R了

通用结果类解析: https://blog.csdn.net/Give_me_a_future/article/details/124579217
src/main/java/com/curious/reggie/common/R.java
1
2
3
4
5
6
7
8
9
10
11
12
13
14
15
16
17
18
19
20
21
22
23
24
25
26
27
28
29
30
31
32
33
34
35
36
37
38
39
40
41
42
| package com.curious.reggie.common;
import lombok.Data;
import java.util.HashMap;
import java.util.Map;
@Data
public class R<T> {
private Integer code;
private String msg;
private T data;
private Map map = new HashMap();
public static <T> R<T> success(T object) {
R<T> r = new R<T>();
r.data = object;
r.code = 1;
return r;
}
public static <T> R<T> error(String msg) {
R r = new R();
r.msg = msg;
r.code = 0;
return r;
}
public R<T> add(String key, Object value) {
this.map.put(key, value);
return this;
}
}
|
1.4.4 真正开发登录方法

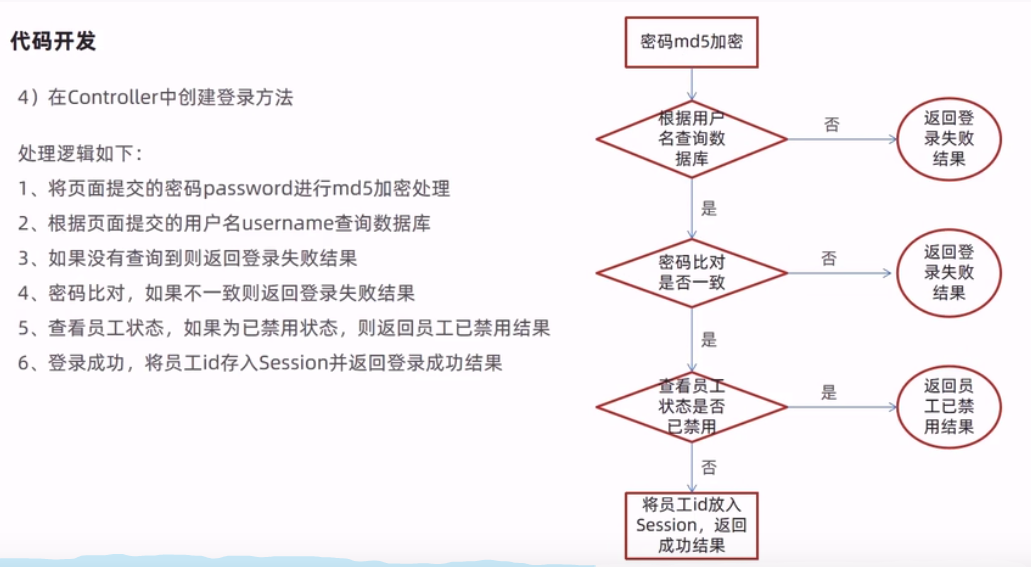
在controller部分添加:
1
2
3
4
5
6
7
8
9
10
11
12
13
14
15
16
17
18
19
20
21
22
23
24
25
26
27
28
29
30
31
32
33
34
35
36
37
38
39
40
41
42
43
44
45
46
47
48
49
50
51
52
53
54
55
56
57
58
59
60
61
62
63
64
65
| package com.curious.reggie.controller;
import com.baomidou.mybatisplus.core.conditions.query.LambdaQueryWrapper;
import com.curious.reggie.common.R;
import com.curious.reggie.entity.Employee;
import com.curious.reggie.service.EmployeeService;
import lombok.extern.slf4j.Slf4j;
import org.springframework.beans.factory.annotation.Autowired;
import org.springframework.util.DigestUtils;
import org.springframework.web.bind.annotation.PostMapping;
import org.springframework.web.bind.annotation.RequestBody;
import org.springframework.web.bind.annotation.RequestMapping;
import org.springframework.web.bind.annotation.RestController;
import javax.servlet.http.HttpServletRequest;
import java.nio.charset.StandardCharsets;
@Slf4j
@RestController
@RequestMapping("/employee")
public class EmployeeController {
@Autowired
private EmployeeService employeeService;
@PostMapping("/login")
public R<Employee> login(HttpServletRequest request, @RequestBody Employee employee){
String password = employee.getPassword();
password = DigestUtils.md5DigestAsHex(password.getBytes());
LambdaQueryWrapper<Employee> queryWrapper = new LambdaQueryWrapper<>();
queryWrapper.eq(Employee::getUsername, employee.getUsername());
Employee emp = employeeService.getOne(queryWrapper);
if(emp == null){
return R.error("登录失败");
}
if(!emp.getPassword().equals(password)){
return R.error("登录失败");
}
if(emp.getStatus() == 0){
return R.error("账号已禁用");
}
request.getSession().setAttribute("employee", emp.getId());
return R.success(emp);
}
}
|
1
2
3
4
5
6
7
8
9
10
11
12
13
14
15
16
17
18
19
20
21
22
23
24
25
26
27
28
29
30
31
32
33
34
35
36
37
38
39
40
41
|
{
"code": 1,
"msg": null,
"data": {
"id": 1,
"username": "admin",
"password": "e10adc3949ba59abbe56e057f20f883e",
"phone": "13812312312",
"sex": "1",
"idNumber": "110101199001010047",
"status": 1,
"createTime": [
2021,
5,
6,
17,
20,
7
],
"updateTime": [
2021,
5,
10,
2,
24,
9
],
"createUser": 1,
"updateUser": 1
},
"map": {}
}
{
"code": 0,
"msg": "登录失败",
"data": null,
"map": {}
}
|
1.4.5 功能测试


