BERT源代码阅读学习
BERT源代码阅读学习,主要是Transformer架构中的Encoder部分,各层的源代码理解与阅读学习
BERT源代码阅读学习
References
BERT源代码学习:https://zhuanlan.zhihu.com/p/360988428
Attention is all you need: https://proceedings.neurips.cc/paper/2017/file/3f5ee243547dee91fbd053c1c4a845aa-Paper.pdf
BERT:https://arxiv.org/pdf/1810.04805.pdf&usg=ALkJrhhzxlCL6yTht2BRmH9atgvKFxHsxQ
Attention机制详解:https://zhuanlan.zhihu.com/p/47282410
positional embedding absolute/relative等不同方式:https://zhuanlan.zhihu.com/p/121126531
torch中的einsum:https://zhuanlan.zhihu.com/p/361209187
Self-Attention with Relative Position Representations: https://arxiv.org/pdf/1803.02155.pdf
1. 模型结构(论文&Transformer架构截图)
1.1 论文&Transformer架构截图
1.1.1 Transformer架构图
左边代表Encoder部分,右边代表Decoder部分。两边的区别个人理解是:
- Encoder是作为NLU(Natrual Language Understanding)来使用的,所以在输入的时候Encoder是能看到全局信息的。从目前接触到的任务来说还是Encoder这边的结构更加常用一些,大部分任务感觉还是属于在NLU的范畴,NLG那边的有些就显得不太好评测或者不是很靠谱;
- 但是在输入Decoder的时候,因为Decoder一般被NLG(Natural Language Generation)类的任务来使用,所以其需要根据上文来生成下文,故在输入的时候需要加mask,即
Masked Multi-Head Attention。此外在decoder部分中还有一个接收来自Encoder那边信息的Multi-Head Attention,也被称作encoder-decoder attention layer,这个地方query来自于前一级的decoder层输出,但其key和value来自于encoder的输出,那么理解来说就是decoder的每一个位置作为key和encoder那边key计算相似度,然后聚合来自encoder那边的value信息; - 和同学讨论后补充:对于Transformer架构的信息,像T5这样的encoder-decoder模型,或者说像是一类依据文本生成文本的,比如翻译任务,那就是使用到整个Transformer架构,其中的encoder-decoder attention可以理解为我需要看着原来的文本来做生成,然后把query看做普通RNN架构中的x,这样x需要聚合来自全部输入文本的信息做attention;对于BERT这类就是只用到Encoder架构;对于GPT类的可能就只是用Decoder部分,里面就没有encoder-decoder attention那个部分了;

1.1.2 Multi-Head Self Attention

1.1.3 BERT Embedding
这个是bert模型结构的embedding输入,也需要联合代码看一下这个过程是怎么实现的。

这里补充贴一张LUKE的图,虽然没看过但是看起来加了一个Entity Type Embedding,好像还是个比较有名的工作

2. 代码学习
2.1 基础简化pipeline代码
1 | |
总结:加载config.json、vocab.txt还有pytorch_model.bin三个文件。其中通过 from_pretrained("./bert_base_uncased")进行指定路径,如果不指定路径的话好像会从huggingface那边下载model,指定路径的话就需要文件夹下有这三个文件;
2.2 model
2.2.1 embeddings、encoder、pooler(※重点)
通过model = BertModel.from_pretrained("./bert_base_uncased")加载模型后,首先可以在这里调试model这个对象包含的内容,model是BertModel的实例化,模型结构主要由model.embeddings (BERTEmbeddings类对象),model.encoder(BertEncoder类对象),model.pooler(BertPooler对象)组成。点开后可以看到各个地方的模型结构与层数,之后会随着模型调试查看数据流向和数据维度的变化。

· class BertEmbeddings层结构
/Users/curious/opt/miniconda3/envs/venv2/lib/python3.9/site-packages/transformers/models/bert/modeling_bert.py
1 | |
1) init
1 | |
简单对init进行解释,这里有三个nn.Embedding层:
- self.word_embeddings:维度从vocab_size(30522)到hidden_size(768)转化,TODO:padding_idx的参数是做什么用的?
- self.position_embeddings:维度从max_position_embeddings(512)到hidden_size(768)转化;
- self.token_type_embeddings:维度从config.type_vocab_size(2,这里的2代表的是有两种类别的,第一个[SEP]前都是0,第二个[SEP]前都是1,这样交叉的)到到hidden_size(768),或者是用来表示padding地方的差异;
这里的self.LayerNorm和self.dropout是剩下两个和forward比较相关的层,初始化都比较正常
和同学讨论下这个nn.Embedding层的用处,之前对这个层一直不是太理解,大概目前的理解是传入的一个比如input_ids是[1, 14]这个shape的,首先其被转化成一个one-hot的表示也就是[1, 14, 30522(这个维度类似一个词典大小)],然后过一个[30522, 768]的,两个乘在一起就有一种对应位把元素取出来的感觉,这样就得到了最终的embedding表示[1, 14, 768]
词表大小30522是针对input_ids embedding的,那么针对positional embedding就是max_seq_len,针对token type的就是2(只有0和1代表两类交替的)
2) forward
forward传入的参数中
- input_ids **[1, seq_len]**:tensor([[ 101, 2762, 3786, 5619, 1016, 1011, 1014, 1998, 2180, 1996, 2088, 2452, 2345, 102]]),这是tokenizer.convert_tokens_to_ids()的结果应该,那边BERT好像还对应了个wordpiecetoken,101是[CLS],102是[PAD]
- token_type_ids **[1, seq_len]**:tensor([[0, 0, 0, 0, 0, 0, 0, 0, 0, 0, 0, 0, 0, 0]]),传入的没有[SEP],只有一类token
- position_ids:暂时为None
- inputs_embeds:暂时为None
step1:根据input_ids提取得到的seq_len长度,初始化position_ids **[1, seq_len]**:tensor([[ 0, 1, 2, 3, 4, 5, 6, 7, 8, 9, 10, 11, 12, 13]])
step2:获取input_embeds和token_type_embeddings,通过上面的传入参数以及nn.Embedding层,并把这两个加在一起
1 | |
embeddings.shape [1, seq_len, hidden_dim]
step3:如果self.position_embedding_type是”absolute”绝对的话,就传入后加上position_embeddings,此时embeddings.shape **[1, seq_len, hidden_dim]**没有变化;absolute就是绝对位置编码,理解是[0, 1, 2, 3…]这样的绝对位置;还有一种position_embedding是相对位置编码的embedding,部分代码整合在了BertSelfAttention这个类中,博客参考:https://blog.csdn.net/chenf1995/article/details/122971023
1 | |
step4:过LayerNorm和dropout,维度不会改变,BertEmbeddings这个类最终输出了一个embeddings [1, seq_len, hidden_dim]的信息,代表将要输入进入encoder结构部分的embeddinginput_embedding+token_type_embedding+position_embedding
1 | |
3) 综合别人博客做一个总结
word_embeddings是上文中subword tokenization对应的词嵌入;
token_type_embeddings是用于表示当前词所在的句子,辅助区别句子与padding,句子对通过[SEP]分隔之间的差异;
position_embeddings是句子中每个词的位置嵌入,用于区别词的顺序,博客说这个地方是训练出来的(从代码看确实如此),而不是计算得到固定嵌入,可能固定嵌入不利于拓展;
三个embedding层不带权重直接加在一起,过LayerNorm+dropout后产生输出,大小为**[batch_size, seq_len, hidden_size]**
4) 补充:positional embedding的不同方式
https://zhuanlan.zhihu.com/p/121126531
背景:
词与词之间的顺序关系往往影响整个句子的含义,因此在对文本数据进行建模的时候需要考虑词与词之间的顺序关系;
建模文本中的顺序关系必须要使用positional encoding吗?-> 不一定,只有使用位置不敏感的模型对文本数据进行建模的时候,才需要额外使用positional encoding;如果模型的输出会随着输入文本数据顺序的变化而变化,那么这个模型就是关于位置敏感的,反之则是位置不敏感的;

在常用的文本模型中,RNN类的就是关于位置敏感的,使用RNN类模型对文本数据建模的时候,模型结构天然考虑了文本中词与词之间的顺序关系。而以attention机制为核心的transformer则是位置不敏感的,使用这一类位置不敏感的模型的时候需要额外加入positional encoding引入文本中词与词的顺序关系;
具体操作:
对于transformer模型的positional encoding有两种主流方式:即绝对位置编码和相对位置编码
其中absolute positional embedding(绝对位置编码)是相对简单理解的,直接对不同位置随机初始化一个positional embedding,加到word embedding和token_type embedding上输入模型作为参数进行训练

另一种是relative positional embedding(相对位置编码),首先motivation是不同位置的positional embedding固然不同,但是位置1和位置2的距离比位置3和位置10的距离更近,位置1 2和3 4距离都只差1,这些关于位置的相对含义模型通过绝对位置编码是否能够学习?绝对位置编码没有约束位置之间这些隐含关系,只能期待他隐式的学习到,所以是否有更合理的方法能够显式的让模型理解位置的相对关系?
11111
详细看一下huggingface transformer代码中的这个部分,参数有”absolute”、”relative_key”和”relative_key_query”三种,这些参数在class BertSelfAttention(nn.Module)这个类中,而不是在最开始的BertEmbedding那块的
absolute:默认值,这部分就不用处理(对这个地方的处理在Embedding层)relative_key:对key_layer作处理,将其与这里的positional_embedding和key矩阵相乘作为key相关的位置编码;relative_key_query:对key和value都进行相乘以作为位置编码。
用下面代码简单加一下注释
1 | |
1 | |
seq_length:这句话的长度,比如14position_ids_l:初始化是一个例如[14, 1]的向量,存储的类似于[[0], [1], [2] …]这样的position_ids_r:初始化是一个例如[1, 14]的向量,存储的类似于[[0, 1, 2, 3, 4]]这样的distance:初始化直接用position_ids_l-position_ids_r,这里直接广播减法,是一个[14, 14]维度的

因为这个地方是在attention这块来做的embedding,attention那边的scoreshape是[batch, head, seq_len, seq_len]的,代表query每个位置处对于key的注意力,那么可以在这里对query和key都搞positional embedding
通过上面几个做操作搞了一个positional_embedding = self.distance_embedding(distance + self.max_position_embeddings - 1),这个有点不为什么每个要把512-1给加上,这样处理完后distance变成了如下所示的tensor
两个距离相隔最远是512,那么这样处理后能保证所有数字都是>=0的,因为离的最远的也就是512了,然后最远的将会到达1023那个感觉

positional_embedding由distance_embedding层后得到,distance_embedding层的传入参数是[5122-1, 64 (即hidden//head_num)]也能理解了,因为词表大小是差不多0-1023的;;positional_embedding的shape是*[seq_len, seq_len, hidden]**的,如果是一个batch的话,那么应该是这个batch里面最大的那个seq_len?
下面代码把query_layer[1, 12, 14, 64]和positional_embedding[14, 14, 64]作为这个torch.einsum的输入,这个地方参考文档https://zhuanlan.zhihu.com/p/361209187,就是把形状bhld,lrd的两个tensor加成一个bhlr的,这里为什么没用两个l可能是因为前面两个seq_len本质上一个来自于query,一个来自于key,而实际上是不需要等长的,只是一般操作默认为等长的了;
重点:这里以第一个作为示例,l和d在前后的箭头中都出现了,那就是在这两个维度上操作,query_layer[1, 12, 14, 64]和positional_embedding[14, 14, 64],转置乘,出来一个relative_position_scores_query**[1, 12, 14, 14]**的,聚合来自position的信息
TODO:还弄得没那么明白,大概明白个意思,之后还要详细看看
1 | |
最后,执行下述代码,注意这个相对位置编码过程可以只对query做,也可以对query和key同时做
1 | |
TODO: https://zhuanlan.zhihu.com/p/121126531这里还介绍到了:Sinusoidal Position Encoding和Complex embedding
·class BertSelfAttention:被BertAttention调用(※重点)
1) init
1 | |
这个地方是整个BERT架构中非常核心的区域
- self.num_attention_heads = config.num_attention_heads:几头注意力机制,在config文件里这里设置为12(一般BERT也是12)
- self.attention_head_size = int(config.hidden_size / config.num_attention_heads):config.hidden_size是768,所以每个头的hidden_size将会是768/12=64;
- self.all_head_size是self.num_attention_heads(12)再乘回self.attention_head_size(64),猜测这样的原因是因为整除造成的可能回来后就不是768了;从其他博客也看到和剪枝有关
- self.query、self.key、self.value三个权重矩阵,都是一个hidden_size(768)到内部这个all_head_size(可能是768,也可能有损失)的转化;
- self.dropout = nn.Dropout(config.attention_probs_dropout_prob):简单的dropout层;
- self.position_embedding_type:这与相对/绝对位置编码有关,如果是绝对位置编码那么在BertEmbedding层里面已经给结合进去了,如果是相对位置编码要在这里实现,不过这个地方暂时先跳过了;
- self.is_decoder = config.is_decoder:标识是否decoder,BERT只是一个encoder就不涉及到这个部分了;
2) forward
1 | |
首先是这个函数,这个函数是拆多头用的,输入的x是[batch, seq_len, hidden]的,先指定new_shape是[batch, seq_len, num_attention_heads, attention_head_size](一般可以认为是[batch, seq_len, 12, 64]),然后.view转化,然后再通过permute改变顺序为**[batch, attention_head_size, seq_len, num_attention_heads]**,这样是因为attention_head_size可以归为”batch“那边的维度了
1 | |
上面贴出来的这段代码省略了针对is_cross_attention(即encoder-decoder attention那个部分的一些处理),此外还忽略了if self.is_decoder:部分的处理,并且忽略了if self.position_embedding_type == "relative_key" 相对位置编码部分的处理;
step1:首先是这个部分,hidden_states**[batch, seq_len, hidden_size]这个tensor过了self.query、self.value、self.key三个linear矩阵,由于这三个linear一般不改变hidden_size,这样得到的是三个[batch, seq_len, hidden_size]形状的tensor,通过上面提到的transpose_for_scores进行reshape,得到三个[batch, head_num, seq_len, attention_head_size]**(一般可以是[1, 12, seq_len, 768])这样的tensor,并且被命名为key_layer、value_layer、query_layer
1 | |
step2:这里就是Q·K^T那个部分了,转置就是在后两个维度上转置,输出的attention_scores是**[batch, head_num, seq_len, seq_len]**形状的tensor,代表query中每个位置处对key全局所有的注意力(后面要过softmax)
1 | |
step3:依照博客简单理解一下不同的positional_embedding_type,这个部分暂时忽略了
1 | |
step4:计算attention_scores,attention_probs;attention_scores在计算query和key的点乘后除以根号下d_k,注意这里的self.attention_head_size是64那个地方的,也就是分成12个头后每个头的hidden_size,如果带有attention_mask的话(注意,一般来说肯定是会有atttention_mask的,应该会在调用这个BertAttention的时候传给他,因为一个batch中大家不等长,肯定要通过mask padding到512这种感觉的) ;;在计算attention_scores时候用的是加法,因为softmax那块要一个很大的负数,比如-1e9这样的,然后过softmax,注意softmax的维度是-1代表query中每个token对所有key位置处的token的attention;;;最后过一个self.dropout,TODO:暂时有点没理解为什么在这里过dropout,而不是乘了之后
1 | |
step5:这里主要就是输出整合了,再reshape回去,变成了**[batch, seq_len, hidden_size]**的这个形状,另外看到config中output_attentions那个参数的作用,要不要把每层的这个attention返回回去,至此class BertSelfAttention(nn.Module)这个地方的forward结束了;
1 | |
·class BertSelfOutput: 被BertAttention调用
1) init&forward
1 | |
这个地方代码结构是相对比较简单的,这里也展现出了BERT中存在的一层add&norm操作,这里应该还只是attention这个部分的内容
·class BertAttention:被BertLayer调用

1) init
1 | |
attention的实现还是不在这里,self.self这个是multi-head self attention机制的实现,self.output的操作是第一个这里完成的部分;
该层中使用到了self.pruned_heads = set()这样一种节约显存的技术,暂时没有了解太深;
2) forward
1 | |
有了上面的BertSelfAttention和BertSelfOutput后,这个组件就比较好理解了
·class BertIntermediate: 被BertLayer调用
在BertAttention这个模块后,还有一个FFNN的操作,这里包含有激活函数;TODO:为什么有些地方需要激活函数,有些地方就不用?像CV那边的话,经常几个层过后就来一个激活,但是这里比如BertAttention里面就没有激活
1) init&forward
1 | |
这个里面调用了config.hidden_act,在config文件那边的话这个地方是"gelu",对应的也就是gelu激活函数,整体来看这个层结构还是很简单的,其中注意dense这个层把768转化为一个config.intermediate_size3072了
·class BertOutput: 被BertLayer调用
注意这里不是BertSelfOutput,刚才那个是中间层的,这个是一个BLOCK的
1) init&forward
1 | |
主要负责的也是一些整合,还有residual的部分,其中注意dense层把intermidiate_size又转化会config.hidden_size了
· class BertLayer(nn.Module):被BertEncoder调用
1) init
1 | |
可以简单理解为,依次调用了BertAttention、BertIntermediate、BertOutput完成了一个BLOCK的操作
2) forward
1 | |
组装起来
· class BertEncoder(nn.Module)层结构
1) init
1 | |
在这里通过config.num_hidden_layers指定了这个BertLayer结构的层数,进一步详细查看BertLayer层的代码,应该对应的就是Transformer架构中如图所示的N×这个部分

2) forward
主要是把N个Layer串接起来forward,返回值封装了一个类
1 | |
· class BertPooler:
这个主要是针对[CLS]token又过了一个pooler
禁用的话:bertmodel初始化有一个配置add_pooling_layer默认为True,改成false就行
1 | |
TODO:这里还有些内容不是很明白,待和zkh讨论,比如说为什么叫pool,然后[CLS]这个token为什么要做这些的操作
· class BertModel(): 各层组合在一起整体的说明
1 | |
重点代码感觉在这个部分,其他部分在制作一些mask类的地方
2.2.2 model.state_dict()
· 加载预训练model
这里加载的时候应该是用到了config.json文件和pytorch_model.bin这两个文件,而vocab.txt应该是tokenizer.from_pretrained()时候用到的,这里详细看一下config.json文件和pytorch_model.bin这两个文件是怎么被用到的
在加载模型后,可以通过打印model.state_dict()调试看到模型的各个参数,这里因为是from_pretrained的,所以已经加载了pytorch_model.bin文件中的内容,而且每次加载出来的结果也都是一样的。
1 | |

加载model,也就是BertModel.from_pretrained(pretrained_model_name_or_path)对应的函数在如下路径,这个地方只要是bert的模型结构,不管是bert-base还是bert-large是都可以通过这里加载的,主要就是读取对应的config.json文件和pytorch_model.bin这两个文件:
/Users/curious/opt/miniconda3/envs/venv2/lib/python3.9/site-packages/transformers/modeling_utils.py
1 | |
1) 注解说明
从预训练的模型配置中实例化预训练的pytorch模型,该模型默认使用
model.eval()设置为评估模式;和同学讨论后补充:model.eval()一般涉及到dropout层与normalization层;;;在BERT和这种NLP领域下,因为BN不怎么用,所以LN实际上只是单个样本内部在seq_len这个维度上做norm,就不涉及到eval这块了,也就是说在NLP任务的eval这里可能只影响到dropout层;
再补充一些BN上的细节,BN在做训练的时候,均值和方差来自于这一组batch的计算,在inference的时候,使用全局的均值和方差,这个全局的均值和方差由之前的每个mini-batch记录而来。
设是[batch, seq_len, hidden],那么BN会计算出来一个[1, seq_len, hidden]的均值;;;LN就会计算出来一个[batch, 1, hidden]的均值,然后怎么怎么处理
输出的警告
Weights from XXX not initialized from pretrained model表示XXX部分的权重没有出现,将使用模型其余部分进行训练,可以通过下游任务来微调这些权重:如果把config文件的层数增加,比如从12层增加到14层的hidden layer结构,可以触发这个Warning
Some weights of BertModel were not initialized from the model checkpoint at ./bert_base_uncased and are newly initialized: [‘bert.encoder.layer.13.attention.output.dense.weight’, ‘bert.encoder.layer.12.intermediate.dense.bias’, ‘bert.encoder.layer.13.attention.self.key.weight’, ‘bert.encoder.layer.13.attention.output.dense.bias’, ‘bert.encoder.layer.13.attention.self.value.weight’, ‘bert.encoder.layer.12.attention.self.query.weight’, ‘bert.encoder.layer.13.attention.self.value.bias’, ‘bert.encoder.layer.12.attention.self.value.bias’, ‘bert.encoder.layer.12.attention.output.LayerNorm.weight’, ‘bert.encoder.layer.13.output.dense.bias’, ‘bert.encoder.layer.13.intermediate.dense.bias’, ‘bert.encoder.layer.13.output.LayerNorm.bias’, ‘bert.encoder.layer.13.output.dense.weight’, ‘bert.encoder.layer.12.attention.self.value.weight’, ‘bert.encoder.layer.12.attention.self.query.bias’, ‘bert.encoder.layer.13.output.LayerNorm.weight’, ‘bert.encoder.layer.12.output.LayerNorm.weight’, ‘bert.encoder.layer.13.attention.self.query.bias’, ‘bert.encoder.layer.13.attention.self.query.weight’, ‘bert.encoder.layer.12.attention.self.key.weight’, ‘bert.encoder.layer.13.attention.output.LayerNorm.weight’, ‘bert.encoder.layer.12.attention.output.dense.bias’, ‘bert.encoder.layer.12.attention.self.key.bias’, ‘bert.encoder.layer.12.output.dense.weight’, ‘bert.encoder.layer.12.attention.output.LayerNorm.bias’, ‘bert.encoder.layer.13.intermediate.dense.weight’, ‘bert.encoder.layer.12.output.LayerNorm.bias’, ‘bert.encoder.layer.13.attention.self.key.bias’, ‘bert.encoder.layer.12.intermediate.dense.weight’, ‘bert.encoder.layer.13.attention.output.LayerNorm.bias’, ‘bert.encoder.layer.12.output.dense.bias’, ‘bert.encoder.layer.12.attention.output.dense.weight’]
输出的警告
Weights from XXX not used in YYY表示预训练文件中的层XXX不被YYY使用,因此那些权重将被丢弃;如果把config文件的层数减少,比如从12层减小到10层的hidden layer结构,可以触发这个Warning
Some weights of the model checkpoint at ./bert_base_uncased were not used when initializing BertModel: [‘bert.encoder.layer.10.intermediate.dense.weight’, ‘cls.predictions.decoder.weight’, ‘cls.predictions.transform.dense.bias’, ‘bert.encoder.layer.11.attention.self.value.bias’, ‘bert.encoder.layer.11.attention.output.dense.bias’, ‘bert.encoder.layer.10.output.dense.bias’, ‘bert.encoder.layer.10.attention.self.key.bias’, ‘bert.encoder.layer.10.attention.output.LayerNorm.bias’, ‘bert.encoder.layer.10.attention.self.value.weight’, ‘bert.encoder.layer.11.attention.self.key.bias’, ‘bert.encoder.layer.11.output.LayerNorm.weight’, ‘bert.encoder.layer.10.output.LayerNorm.bias’, ‘bert.encoder.layer.11.output.dense.bias’, ‘cls.predictions.transform.LayerNorm.weight’, ‘bert.encoder.layer.10.attention.output.dense.bias’, ‘cls.seq_relationship.bias’, ‘bert.encoder.layer.10.attention.self.value.bias’, ‘bert.encoder.layer.10.attention.output.dense.weight’, ‘cls.predictions.bias’, ‘bert.encoder.layer.10.attention.self.query.weight’, ‘bert.encoder.layer.11.attention.self.query.bias’, ‘cls.predictions.transform.LayerNorm.bias’, ‘bert.encoder.layer.11.attention.output.LayerNorm.bias’, ‘bert.encoder.layer.10.attention.self.query.bias’, ‘cls.predictions.transform.dense.weight’, ‘bert.encoder.layer.10.attention.output.LayerNorm.weight’, ‘bert.encoder.layer.10.output.dense.weight’, ‘bert.encoder.layer.11.attention.self.key.weight’, ‘bert.encoder.layer.11.attention.self.query.weight’, ‘cls.seq_relationship.weight’, ‘bert.encoder.layer.11.attention.self.value.weight’, ‘bert.encoder.layer.11.intermediate.dense.weight’, ‘bert.encoder.layer.10.output.LayerNorm.weight’, ‘bert.encoder.layer.11.attention.output.dense.weight’, ‘bert.encoder.layer.10.intermediate.dense.bias’, ‘bert.encoder.layer.11.output.dense.weight’, ‘bert.encoder.layer.11.intermediate.dense.bias’, ‘bert.encoder.layer.11.output.LayerNorm.bias’, ‘bert.encoder.layer.10.attention.self.key.weight’, ‘bert.encoder.layer.11.attention.output.LayerNorm.weight’]
这里额外输出了几个
cls.xxx,就是说没有使用这些检查点的权重,从一些解释来看这些内容应该是要被下游分类器用到的,这些内容将被初始化重新训练。目前代码里只是直接简单应用了这个的输出,而没有针对下游任务fine-tune那些的过程;
2) 参数说明
pretrained_model_name_or_path (`str` or `os.PathLike`, *optional*)1)可以是一个字符串代表
model id,这个model id可以从huggingface.co上获取,比如直接使用bert-base-uncased,或者使用带有用户名称的这个model id例如hfl/chinese-macbert-base,这种使用方法下可能会从huggingface那边完成下载;2)可以是一个包含有pytorch_model.bin和config.json文件的路径,例如
./bert_base_uncased/,注意这个目录下的内容需要通过PreTrainedModel.save_pretrained方法来得到,否则保存出来的文件可能和transformer(huggingface这一套)不太配合;3)其余用法不太常见或者一般不使用,好像可以从tensorflow和flax的checkpoint进行加载,如果设置为None的话就是通过其他办法已经把config和state_dict给加载进去了;
output_attentions用法:
model = BertModel.from_pretrained("./bert_base_uncased")这是一个可能相对再常用一点的参数,模型输出的output包含了一个
output['attentions']的参数输出,在调试的时候发现他是一个长度为12的tuple(这里的长度12是bert的层数),tuple中每个位置上是shape[1,12, seq_len, seq_len](这里的长度12应该是multi-head的头数目),output_attentions应该是softmax((query · key)/sqrt(d_k))的结果;注意shape[1,12, seq_len, seq_len]这个地方,softmax应该是在-1dim上做的,代表query中的每个位置处,对于每一个key的attention score,所以来做求和的话,应该能得到一个1的结果;在后面看forward代码的时候,还要回来看一下这个地方

hidden_states用法:
model = BertModel.from_pretrained("./bert_base_uncased", output_hidden_states=True)这是中间层(隐层)tensor的output输出,和output_attentions一样,这些内容既可以在from_pretrained中给带过去,也可以直接写在config.json文件里

上面可能是一些相对常用的参数,暂时理解来说在
.from_pretrained("./bert_base_uncased")这个方法中带的其他一些参数可以和config加参数起到同样的效果,也就证明这个方法用到了config.json这个文件
3) 内部流程说明(※重点)
内部这个地方还是写的比较详细的,像各种Exception也都实现的非常完整,大概理解一下其中的重点部分,主要目标就是加载config.json和pytorch_model.bin两个文件。
config.json和pytorch_model.bin应该只有model这边用到,tokenizer那边只用到vocab.txt;;从model.from_pretrained接收参数是一个路径,而tokenizer.from_pretrained接收参数是一个vocab.txt文件的路径或者上级路径感觉也能证明这一点
首先加载config.json
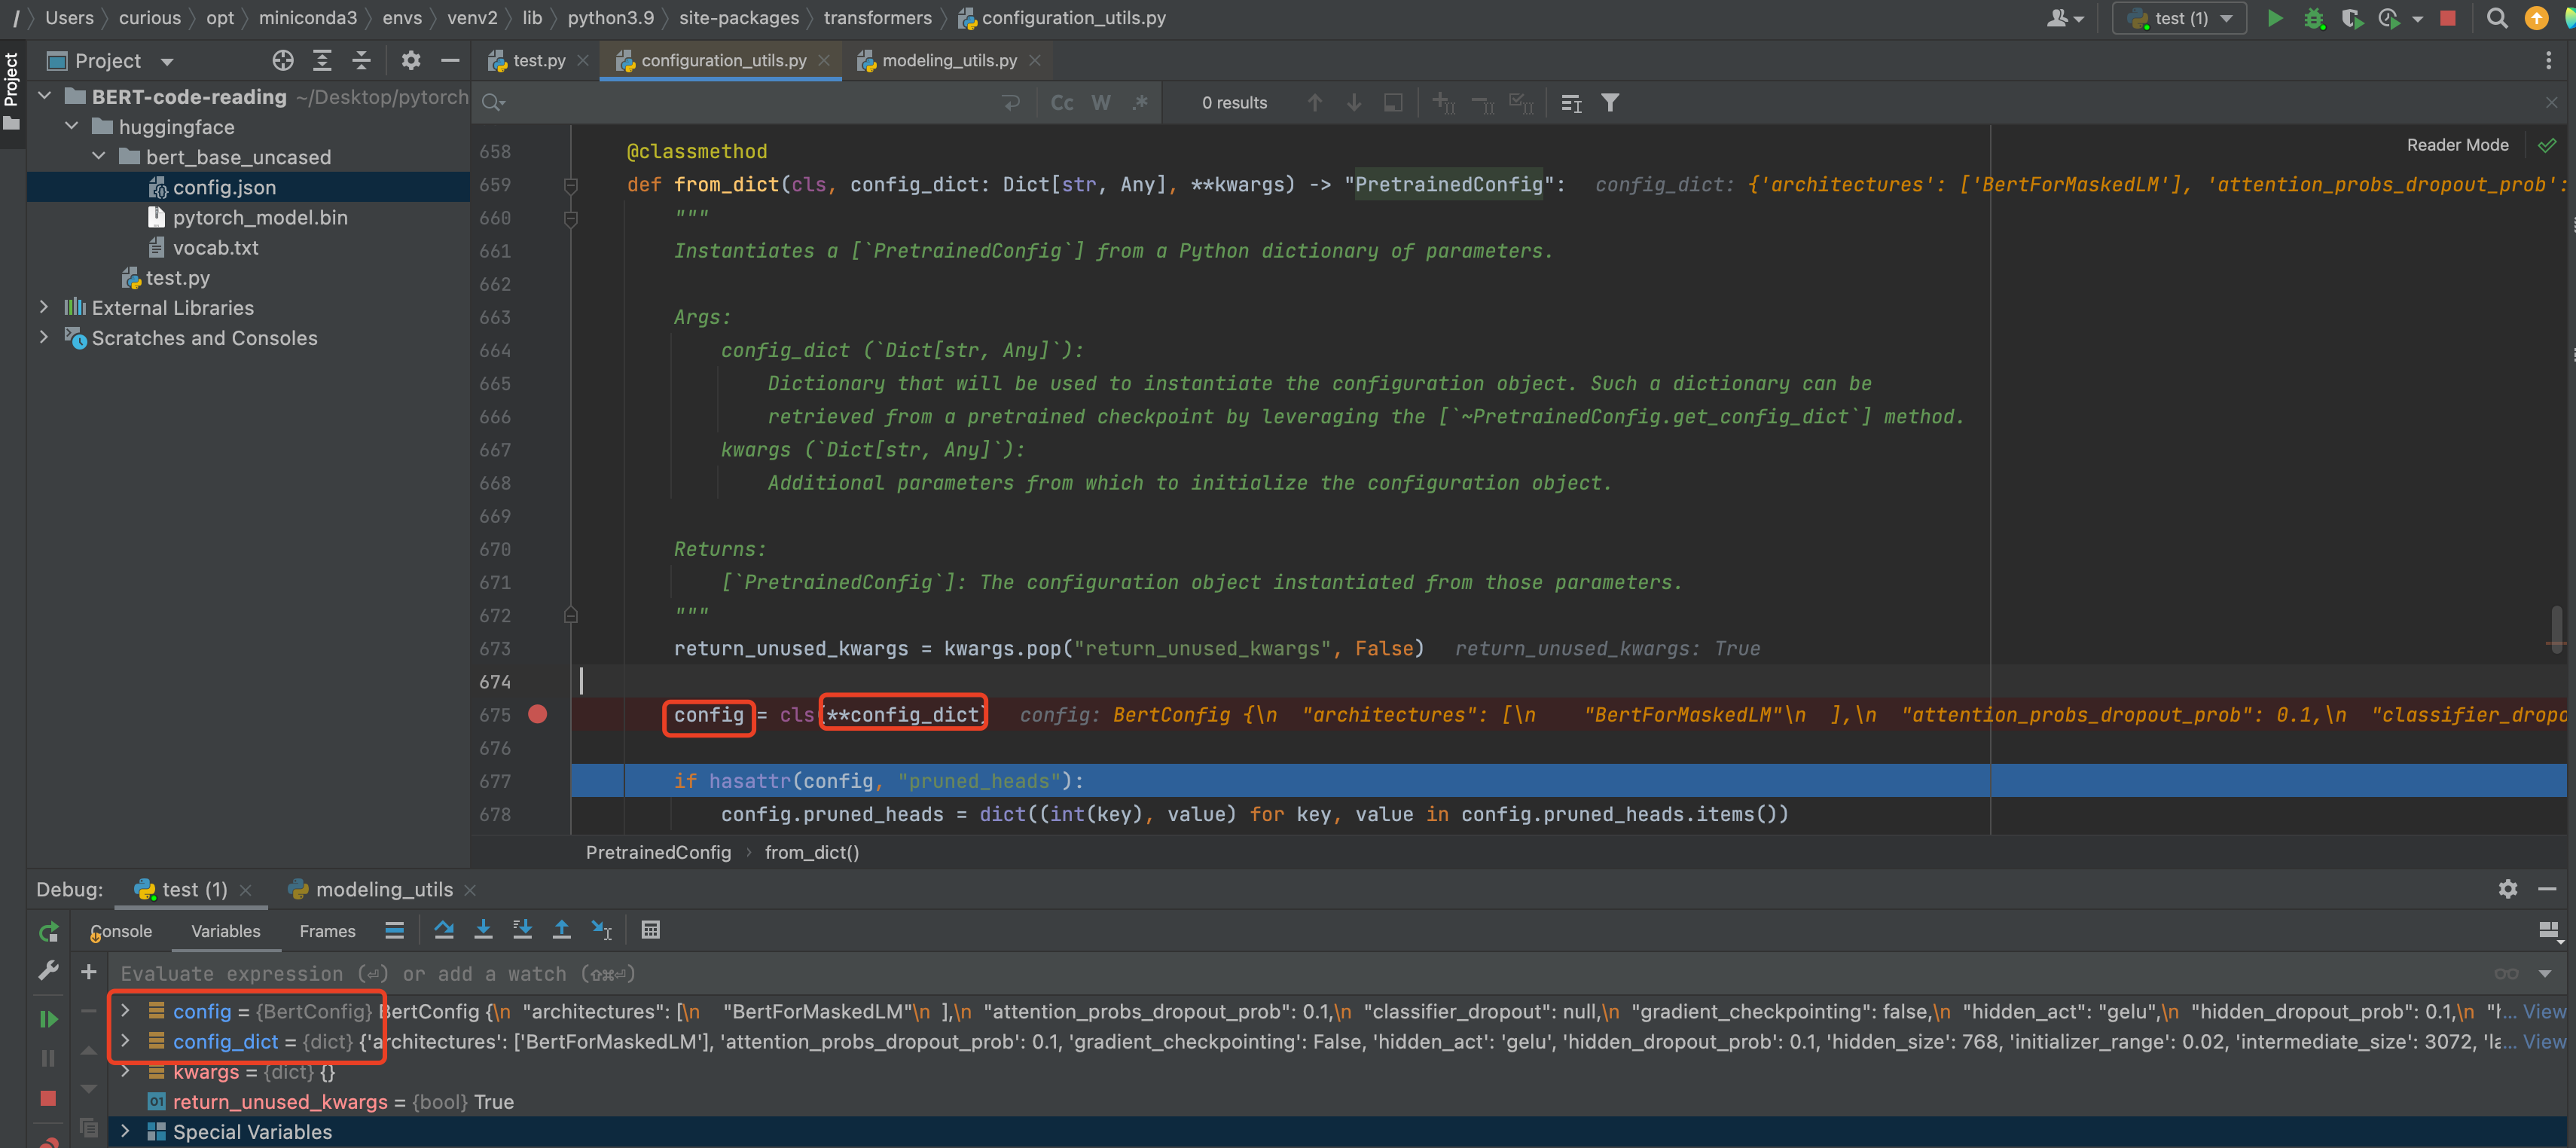
在下面这段代码中,config_path加载到了pretrained_model_name_or_path中的内容,也就是
"./bert_base_uncased",向下层cls.config_class.from_pretrained传递1
2
3
4
5
6
7
8
9
10
11
12
13
14
15
16
17
18
19
20# /Users/curious/opt/miniconda3/envs/venv2/lib/python3.9/site-packages/transformers/modeling_utils.py
# Load config if we don't provide a configuration
if not isinstance(config, PretrainedConfig):
config_path = config if config is not None else pretrained_model_name_or_path
config, model_kwargs = cls.config_class.from_pretrained(
config_path,
cache_dir=cache_dir,
return_unused_kwargs=True,
force_download=force_download,
resume_download=resume_download,
proxies=proxies,
local_files_only=local_files_only,
use_auth_token=use_auth_token,
revision=revision,
_from_auto=from_auto_class,
_from_pipeline=from_pipeline,
**kwargs,
)
else:
model_kwargs = kwargs这里debug调试了一下
cls.config_class:<class 'transformers.models.bert.configuration_bert.BertConfig'>,于是在去看BertConfig这块的.from_pretrained,1
2
3
4
5
6
7
8
9
10
11
12
13
14# /Users/curious/opt/miniconda3/envs/venv2/lib/python3.9/site-packages/transformers/configuration_utils.py
@classmethod
def from_pretrained(cls, pretrained_model_name_or_path: Union[str, os.PathLike], **kwargs) -> "PretrainedConfig":
"""
一些注释,为了放在md里暂时删除了
"""
config_dict, kwargs = cls.get_config_dict(pretrained_model_name_or_path, **kwargs)
if "model_type" in config_dict and hasattr(cls, "model_type") and config_dict["model_type"] != cls.model_type:
logger.warning(
f"You are using a model of type {config_dict['model_type']} to instantiate a model of type "
f"{cls.model_type}. This is not supported for all configurations of models and can yield errors."
)
return cls.from_dict(config_dict, **kwargs)在往下看,调用了
cls.get_config_dict这个函数,最后一路往下找,直到找到这里,加载json文件,返回一个dict对象,在上面那段代码里最后return了一个cls.from_dict1
2
3
4
5
6# /Users/curious/opt/miniconda3/envs/venv2/lib/python3.9/site-packages/transformers/configuration_utils.py
@classmethod
def _dict_from_json_file(cls, json_file: Union[str, os.PathLike]):
with open(json_file, "r", encoding="utf-8") as reader:
text = reader.read()
return json.loads(text)看了一下
cls.from_dict,应该是这里最终返回了一个BertConfig类的对象,这里字典前面加两个*号是将字典解开成为独立的元素作为形参
其次加载pytorch_model.bin文件
通过在
config_path目录下寻找文件,命中了pytorch_model.bin这个pytorch的checkpoint文件
找到这个文件后,这里做了一个和cache判断的操作,这个和huggingface这里实现可以到远程下载有关,如果过了这个函数后还是本地的路径,那就说明是用的本地的文件实现
1
2
3
4
5
6
7
8
9
10
11
12# /Users/curious/opt/miniconda3/envs/venv2/lib/python3.9/site-packages/transformers/modeling_utils.py
# Load from URL or cache if already cached
resolved_archive_file = cached_path(
archive_file,
cache_dir=cache_dir,
force_download=force_download,
proxies=proxies,
resume_download=resume_download,
local_files_only=local_files_only,
use_auth_token=use_auth_token,
user_agent=user_agent,
)因为是pytorch形式的checkpoint,在这里
load_state_dict()
把
state_dict传入这里,进一步进行处理,这里返回就会有missing unexpect这些1
2
3
4
5
6
7
8
9
10
11
12
13
14# /Users/curious/opt/miniconda3/envs/venv2/lib/python3.9/site-packages/transformers/modeling_utils.py
elif from_pt:
if low_cpu_mem_usage:
cls._load_pretrained_model_low_mem(model, loaded_state_dict_keys, resolved_archive_file)
else:
model, missing_keys, unexpected_keys, mismatched_keys, error_msgs = cls._load_pretrained_model(
model,
state_dict,
resolved_archive_file,
pretrained_model_name_or_path,
ignore_mismatched_sizes=ignore_mismatched_sizes,
sharded_metadata=sharded_metadata,
_fast_init=_fast_init,
)在如下函数中完成比对操作,这里一些的输出错误经过
state_dict的比对而发现,也就对应了“2.2.2节中,加载预训练model中第一部分,作者在开头给出的注解说明”,至此这两个文件1
2
3
4
5
6
7
8
9
10
11
12
13
14
15
16
17
18
19
20
21
22
23
24
25
26
27
28
29
30
31
32
33
34
35
36
37
38
39
40
41
42
43
44
45
46
47
48
49
50
51
52
53
54
55
56
57
58
59
60
61
62
63
64
65
66
67
68
69
70
71
72
73
74
75
76
77
78
79
80
81
82
83
84
85
86
87
88
89
90
91
92
93
94
95
96
97
98
99
100
101
102
103
104
105
106
107
108
109
110
111
112
113
114
115
116
117
118
119
120
121
122
123
124
125
126
127
128
129
130
131
132
133
134
135
136
137
138
139
140
141
142
143
144
145
146
147
148
149
150
151
152
153
154
155
156
157
158
159
160
161
162
163
164
165
166
167
168
169
170
171
172
173
174
175
176# /Users/curious/opt/miniconda3/envs/venv2/lib/python3.9/site-packages/transformers/modeling_utils.py
@classmethod
def _load_pretrained_model(
cls,
model,
state_dict,
resolved_archive_file,
pretrained_model_name_or_path,
ignore_mismatched_sizes=False,
sharded_metadata=None,
_fast_init=True,
):
# Retrieve missing & unexpected_keys
model_state_dict = model.state_dict()
expected_keys = list(model_state_dict.keys())
loaded_keys = list(state_dict.keys()) if state_dict is not None else sharded_metadata["all_checkpoint_keys"]
prefix = model.base_model_prefix
def _fix_key(key):
if "beta" in key:
return key.replace("beta", "bias")
if "gamma" in key:
return key.replace("gamma", "weight")
return key
loaded_keys = [_fix_key(key) for key in loaded_keys]
if len(prefix) > 0:
has_prefix_module = any(s.startswith(prefix) for s in loaded_keys)
expects_prefix_module = any(s.startswith(prefix) for s in expected_keys)
else:
has_prefix_module = False
expects_prefix_module = False
# key re-naming operations are never done on the keys
# that are loaded, but always on the keys of the newly initialized model
remove_prefix_from_model = not has_prefix_module and expects_prefix_module
add_prefix_to_model = has_prefix_module and not expects_prefix_module
if remove_prefix_from_model:
expected_keys_not_prefixed = [s for s in expected_keys if not s.startswith(prefix)]
expected_keys = [".".join(s.split(".")[1:]) if s.startswith(prefix) else s for s in expected_keys]
elif add_prefix_to_model:
expected_keys = [".".join([prefix, s]) for s in expected_keys]
missing_keys = list(set(expected_keys) - set(loaded_keys))
unexpected_keys = list(set(loaded_keys) - set(expected_keys))
# Some models may have keys that are not in the state by design, removing them before needlessly warning
# the user.
if cls._keys_to_ignore_on_load_missing is not None:
for pat in cls._keys_to_ignore_on_load_missing:
missing_keys = [k for k in missing_keys if re.search(pat, k) is None]
if cls._keys_to_ignore_on_load_unexpected is not None:
for pat in cls._keys_to_ignore_on_load_unexpected:
unexpected_keys = [k for k in unexpected_keys if re.search(pat, k) is None]
if _fast_init:
# retrieve unintialized modules and initialize
uninitialized_modules = model.retrieve_modules_from_names(
missing_keys, add_prefix=add_prefix_to_model, remove_prefix=remove_prefix_from_model
)
for module in uninitialized_modules:
model._init_weights(module)
# Make sure we are able to load base models as well as derived models (with heads)
start_prefix = ""
model_to_load = model
if len(cls.base_model_prefix) > 0 and not hasattr(model, cls.base_model_prefix) and has_prefix_module:
start_prefix = cls.base_model_prefix + "."
if len(cls.base_model_prefix) > 0 and hasattr(model, cls.base_model_prefix) and not has_prefix_module:
model_to_load = getattr(model, cls.base_model_prefix)
if any(key in expected_keys_not_prefixed for key in loaded_keys):
raise ValueError(
"The state dictionary of the model you are training to load is corrupted. Are you sure it was "
"properly saved?"
)
if state_dict is not None:
# Whole checkpoint
mismatched_keys = []
if ignore_mismatched_sizes:
for checkpoint_key in loaded_keys:
model_key = checkpoint_key
if remove_prefix_from_model:
# The model key starts with `prefix` but `checkpoint_key` doesn't so we add it.
model_key = f"{prefix}.{checkpoint_key}"
elif add_prefix_to_model:
# The model key doesn't start with `prefix` but `checkpoint_key` does so we remove it.
model_key = ".".join(checkpoint_key.split(".")[1:])
if (
model_key in model_state_dict
and state_dict[checkpoint_key].shape != model_state_dict[model_key].shape
):
mismatched_keys.append(
(checkpoint_key, state_dict[checkpoint_key].shape, model_state_dict[model_key].shape)
)
del state_dict[checkpoint_key]
error_msgs = _load_state_dict_into_model(model_to_load, state_dict, start_prefix)
else:
# Sharded checkpoint
# This should always be a list but, just to be sure.
if not isinstance(resolved_archive_file, list):
resolved_archive_file = [resolved_archive_file]
error_msgs = []
for shard_file in resolved_archive_file:
state_dict = load_state_dict(shard_file)
# Mistmatched keys contains tuples key/shape1/shape2 of weights in the checkpoint that have a shape not
# matching the weights in the model.
mismatched_keys = []
if ignore_mismatched_sizes:
for checkpoint_key in loaded_keys:
model_key = checkpoint_key
if remove_prefix_from_model:
# The model key starts with `prefix` but `checkpoint_key` doesn't so we add it.
model_key = f"{prefix}.{checkpoint_key}"
elif add_prefix_to_model:
# The model key doesn't start with `prefix` but `checkpoint_key` does so we remove it.
model_key = ".".join(checkpoint_key.split(".")[1:])
if (
model_key in model_state_dict
and state_dict[checkpoint_key].shape != model_state_dict[model_key].shape
):
mismatched_keys.append(
(checkpoint_key, state_dict[checkpoint_key].shape, model_state_dict[model_key].shape)
)
del state_dict[checkpoint_key]
error_msgs += _load_state_dict_into_model(model_to_load, state_dict, start_prefix)
if len(error_msgs) > 0:
error_msg = "\n\t".join(error_msgs)
raise RuntimeError(f"Error(s) in loading state_dict for {model.__class__.__name__}:\n\t{error_msg}")
if len(unexpected_keys) > 0:
logger.warning(
f"Some weights of the model checkpoint at {pretrained_model_name_or_path} were not used when "
f"initializing {model.__class__.__name__}: {unexpected_keys}\n"
f"- This IS expected if you are initializing {model.__class__.__name__} from the checkpoint of a model trained on another task "
f"or with another architecture (e.g. initializing a BertForSequenceClassification model from a BertForPreTraining model).\n"
f"- This IS NOT expected if you are initializing {model.__class__.__name__} from the checkpoint of a model that you expect "
f"to be exactly identical (initializing a BertForSequenceClassification model from a BertForSequenceClassification model)."
)
else:
logger.info(f"All model checkpoint weights were used when initializing {model.__class__.__name__}.\n")
if len(missing_keys) > 0:
logger.warning(
f"Some weights of {model.__class__.__name__} were not initialized from the model checkpoint at {pretrained_model_name_or_path} "
f"and are newly initialized: {missing_keys}\n"
f"You should probably TRAIN this model on a down-stream task to be able to use it for predictions and inference."
)
elif len(mismatched_keys) == 0:
logger.info(
f"All the weights of {model.__class__.__name__} were initialized from the model checkpoint at {pretrained_model_name_or_path}.\n"
f"If your task is similar to the task the model of the checkpoint was trained on, "
f"you can already use {model.__class__.__name__} for predictions without further training."
)
if len(mismatched_keys) > 0:
mismatched_warning = "\n".join(
[
f"- {key}: found shape {shape1} in the checkpoint and {shape2} in the model instantiated"
for key, shape1, shape2 in mismatched_keys
]
)
logger.warning(
f"Some weights of {model.__class__.__name__} were not initialized from the model checkpoint at {pretrained_model_name_or_path} "
f"and are newly initialized because the shapes did not match:\n{mismatched_warning}\n"
f"You should probably TRAIN this model on a down-stream task to be able to use it for predictions and inference."
)
return model, missing_keys, unexpected_keys, mismatched_keys, error_msgs
4) 额外补充
应该是这里的实例化把config给model传进去了,于是model需要的key可能少于、或者多于提供给他的key(pytorch_model.bin),这里是一个super().__init__(),可能是调用到nn.Module这个上层了,然后依据传入的config不知道怎么操作,把层数什么的网络结构给拼上了;另:也有可能是要加载到这个/Users/curious/opt/miniconda3/envs/venv2/lib/python3.9/site-packages/transformers/models/bert/modeling_bert.py里面的BertModel类,这样BertModel类是super代表的上层?


· 通过config加载空模型并设置seed
如果是没有from_pretrained,而是通过model = BertModel()加载空模型的话,打印会看到初始化的参数,如下所示(另外注意,这种不从预训练文件中读取的话,需要加载config参数):
BertConfig、BertModel、BertTokenizer
1 | |

这里如果再次尝试加载空模型的时候,因为参数是随机初始化的,所以参数初始化结果可能有所不同,如下图所示

通过set_seed进行指定,可以保证每次加载空模型时初始化的参数是一样的,set_seed的代码段如下,(实际使用上来说其实不一定需要写成这种函数的方式,直接写个几行就可以):
1 | |
这个地方加载config的时候直接用到的是config = BertConfig(),也就是BertConfig类中的内容,对这里进行了一下详细的调试,目前的理解是他实现了一个BertConfig类,继承自PretrainedConfig这个大类。平常在fine-tune阶段直接用到的config.json文件应该是从这个BertConfig保存而来的;;;如果要是自己训练的话,可能可以实现一个新的XxxConfig类,然后内部把参数什么的都设置为自己想要的,比如层数减少一些什么的
/Users/curious/opt/miniconda3/envs/venv2/lib/python3.9/site-packages/transformers/models/bert/configuration_bert.py
1 | |
· 保存模型
通过如下命令可以完成一个模型的保存,这样会在目录下生成config.json、pytorch_model.bin这两个文件,结合上面的BertConfig,如果有一个自己的模型的话,就可以魔改一下那边的XxxConfig,比如减小一些层数训练什么的,下次通过from_pretrained应该就可以加载回来了;;;这里也要集合下上面那个加载预训练model来一起看;;;
或者说,这套BertConfig和from transformers.models.bert import modeling_bert 那边的bert模型是对应的,只要修改BertConfig这些参数就可以制作自己的bert了,比如可能有BertTiny,或者其他版本的,都可以通过Bert这边的pipeline来走这样一个流程
1 | |
2.3 tokenizer
1 | |
tokenizer的from_pretrain在这里
/Users/curious/opt/miniconda3/envs/venv2/lib/python3.9/site-packages/transformers/tokenization_utils_base.py

1 | |
TODO:这里是不是还有些加入特殊token的操作,曾经在一些论文代码里见过
tokenizer的作用就是把一句话按照vocab中转成一个id那个感觉,tokenizer.tokenize、tokenizer.convert_tokens_to_ids()和其反向的tokenizer_convert_ids_to_tokens比较常用;

3. Transformer&BERT论文阅读中的重点记录
3.1 Attention is all you need


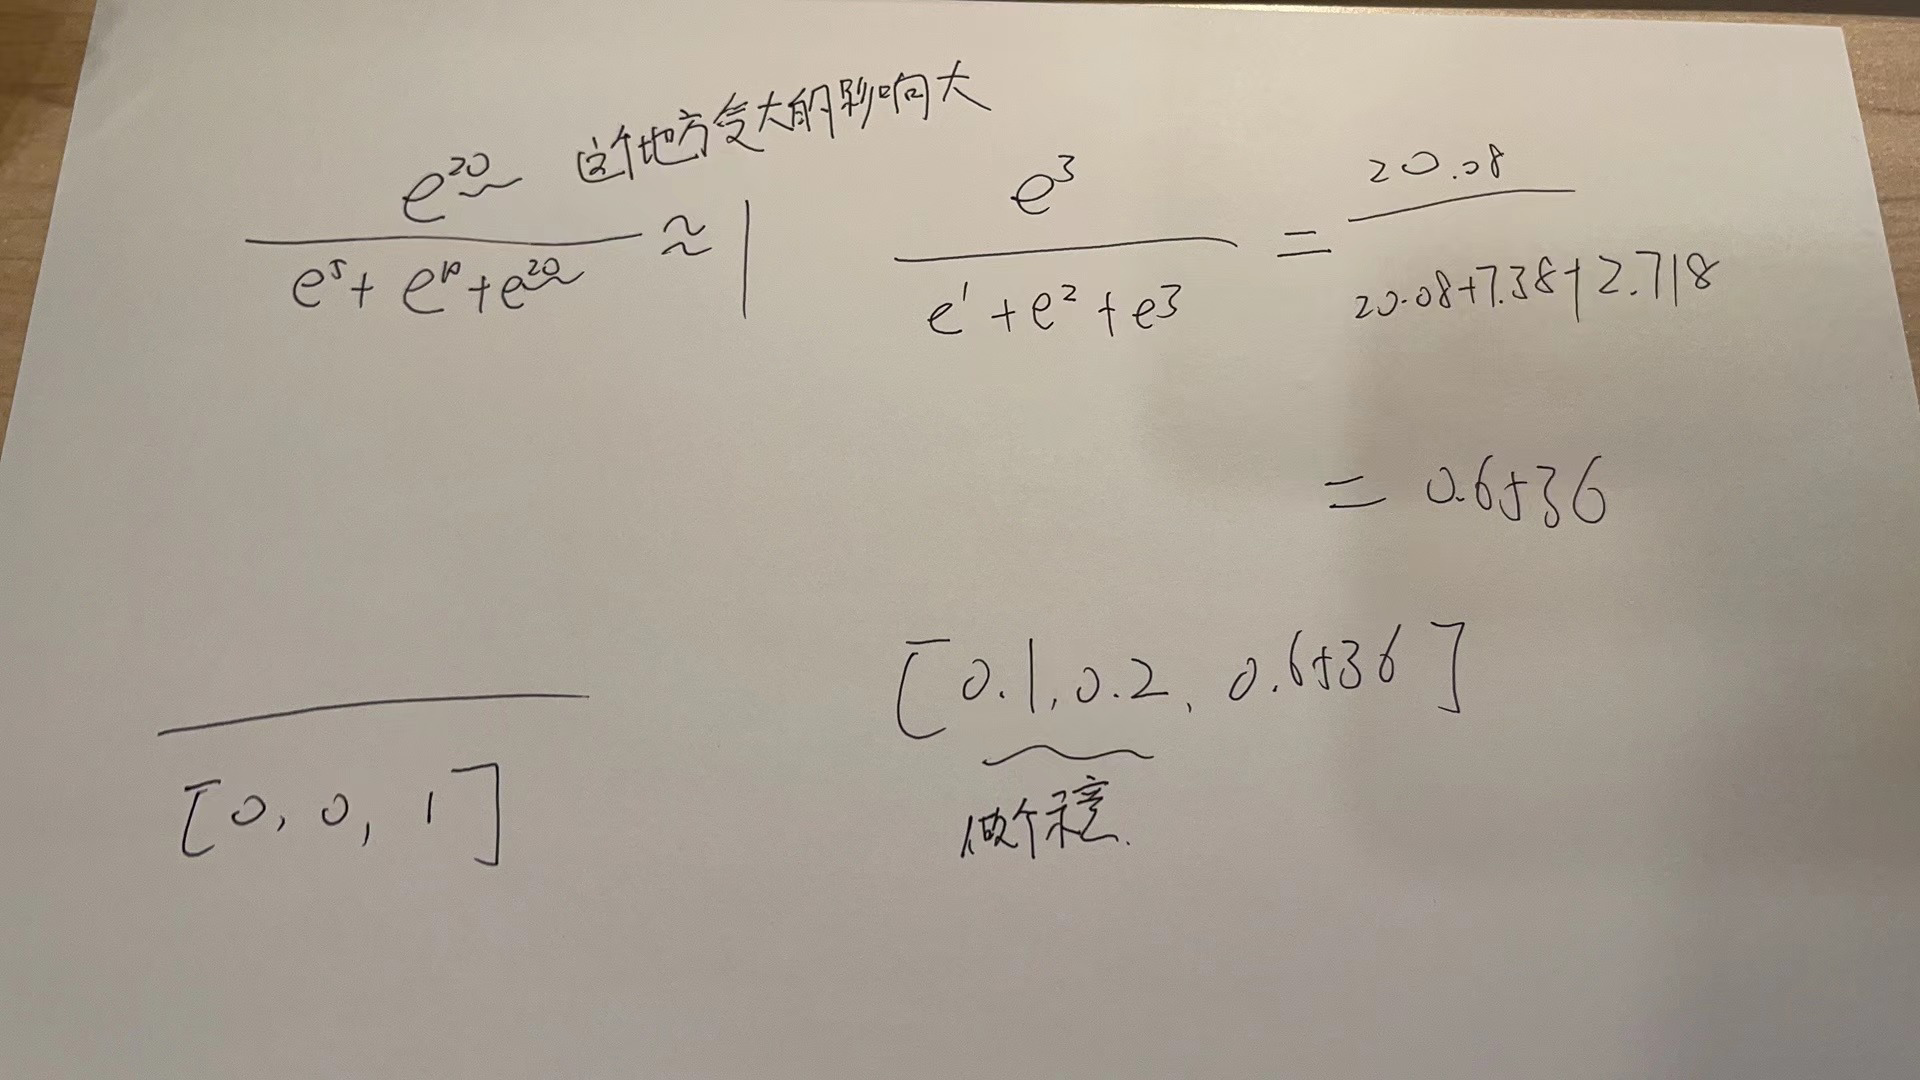
就是那个指数,如果有一个特别大的,他softmax算出来就很趋向于1了
这个现象会随着指数的增大而明显,比如指数是3的时候,就不明显,指数是20的时候就很明显
3.2 BERT
TODO